REEF BALL MOLD
SYSTEMS TRAINING MANUAL-
Not a substitute for training but a supplement to training.
© 1995/1996/1997/1998/1999/2000/2001/2002/2006/2007
Reef Ball Foundation Inc.
All Rights Reserved.
|
Trademark, Patent Protection and Copyright Notice:
Combo Ball, Goliath Booster Ring, Goliath Ball, Super Ball, Ultra Ball, Reef
Ball, Pallet Ball, Bay Ball, Mini-Bay Ball, Lo Pro Ball, Oyster Ball, Model
Ball and RBDG Logo are trademarks of Reef Ball Foundation Inc., construction
techniques, and swiss cheese hole patterns are Patented or Patent Pending.
All sizes of Reef Balls are copyrighted 1994 (Reg. No. TXu 630-706) which is
recognized internationally except in Iran. This manual was
first published 7/4/95 and has been updated most recently on October 16, 2007
|
Reef Ball mold systems are designed to create stable artificial reef modules
that have variable sizes, shapes, hole sizes, hole patterns, hole shapes,
surface textures and weights. Molds are also designed to accommodate a variety
of concrete mix designs. There are many styles which may not be covered in this manual so please contact your trainer if you are interested in one of these methods of using your molds.Our research has concluded that variety is one
important factor in creating a reef with good species diversity. Although your
goals may be different, the Reef Ball Foundation Inc. measures the success of
our reefs by the number of species and their density that use Reef Ball reefs
versus the number of species and their density that use the natural reefs in
the same environment. Although learning how to use the mold to consistently
produce usable modules is easy, it is an art and takes practice to perfect the
techniques that produce unique and interesting modules. It takes even more training to become very
efficient at making Reef Balls, such as in the case of an Authorized Reef Ball
contractor where many time saving techniques are allowed which we don't suggest
for regular mold users due to the more technical nature and higher level of
error potential. However, even "failures" are not usually no
that bad and can often be used as reef material. As long as the bottom base of
concrete remains intact, modules produced by our molds will still have the same
stable characteristics as "perfect" modules. First, learn to perfect
the basic casting techniques. Remember that concrete is like a cake mix. One
must have a good recipe, mix the batter correctly, bake at the right
temperature and cool the cake properly in order to make a nice cake. Short cuts
can sometimes still make an edible cake, but too many changes can doom one to
disaster. The same is true for Reef Balls. Also remember SAFETY first.
At the Reef Ball Foundation Inc., we have now made more than 1/2 a million
Reef Balls in over 3,500 projects...and there are nearly as many ways to build
a Reef Ball. So please understand that there are many ways to use your
molds, up to 9 different styles are possible with a Reef Ball mold. Just ask and we can help guide you to use
them in ways that best meet the goals of your project....We strongly recommend
initial on-site training for all of our clients...so we better understand exactly
the goals and conditions you are working with to offer you the best possible
advise.
- Circular saw
- Power drill with 5/8 inch bit
- 1 1/4" inch flat wood
blade bit (for countersinking)
- Screwdriver (power
recommended)
- Philips oval head deck screws
(1 3/4)
- 3/4" Plywood
- 4X6 boards (sometimes
optional)
- 2X4 boards (sometimes
optional)
- Spray paint (3 colors)
- 1/4" bit (to mark mold
fitted to base)
- Plumbers Straps (to secure
pins to base-optional)
- Small box of drywall screws (to
secure plumbers strap to base)
§ 1/4"
Drill bit (for attachment adapter assembly)
§ Phillips
screwdriver
- Thick Rubber or Nitril
Gloves (for concrete)
- Work gloves
- Rubber mallet(s)
- Plastic wedge (to break out
finished modules if left in the mold too long)-optional
- Sugar & fine mist
sprayer (Garden sprayer or air powered paint sprayer is the fastest)
- Flathead screwdriver
(battery power driven, especially if you have Pallet, Reef, Ultra or Super
molds due to the larger number of polyform side bladders that have air
added or removed by a screw cap)
- Submersible Thermometer (if
using concrete waste)
- Air compressor or scuba tank
with adapter to allow for controlled filling of air bladders.
- Trowel to direct the
concrete into the mold
- Hammer (Good quality hammers
make things much faster, steel shaft is best)
- Vacuum pump (A shopvac or
“stinger” fitted with air line
hosing with the intake blocked works well).
- Extra Adva Flow (in cast the
concrete in the truck is too thick)
- 5 gallon buckets (for moving
concrete around)
- Wheel Barrel (for moving
larger amounts of concrete around
- Duct Tape (to temporarily
patch unused holes)
- Newspaper (to plug a leaking
mold)
- Extra Polyform Screw Caps
(to replace lost or damaged ones)
- Concrete mixer and
associated tools (if mixing by hand)
- Abrasion resistant lifting
straps (available from Reef Innovations) [Optional but helpful when
lifting equipment is used or for larger operations where normal straps
would wear out from the tough Reef Ball concrete] You will need 2 straps
for floating deployments if your equipment (such as a crane) is doing to
place the Reef Balls directly into the water
- Hooks, shackles, chains,
grab hooks or other fittings for your moving equipment (often a front end
loader or crane).
- Knife
- BCD inflator tip
- Extra rope
- Dive gear (optional)
- Extra buoys
- Flathead screwdriver
- Anchor (optional)
- Extra 1000 lb pillow lift
bags (Subslave is a good brand)
(optional for smaller units, required for breakwater or very heavy Reef
Balls, Ultra Balls or Super Balls)
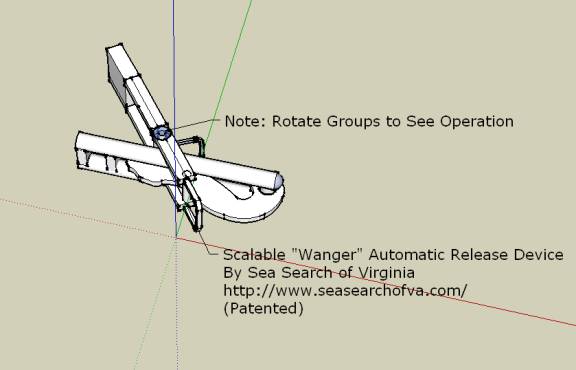
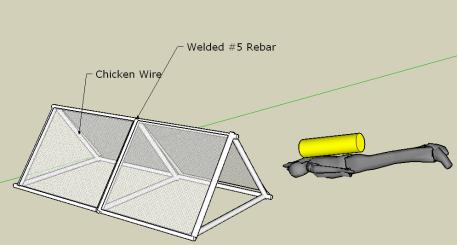
- “Wanger” (see image below
available in Google Sketch-up as a free model) or "Pelican"
Release hook
- Lifting sling & chain
- Leather gloves
- Hydraulic Crane (optional,
don’t use geared cranes except on very calm seas)
- Needle value (to inflate
tether balls)
- 1 1/4" Paddle bit (to
redrill tether ball holes)
- 3 1/2" hole saw, (to
redrill A-0 holes)
- 1" Drill bit to redrill
hold down bar holes
- 3/4" drill bit to
redrill side flange holes
- 1 can WD-40 to lubricate
metal parts and keep them from rusting
- Razor knife (to open boxes,
etc.)
- Hacksaw blade...to fine cut
fiberglass when reshaping
- Magnum 44 perm marker, to
mark holes for re-drilling
- Roll of Hi-Vis string (to
set up tethered bleed pins, also useful for deployment layouts)
- Fiberglass resin &
activator (for
mold repair work)
- Glass roving or cloth (for
mold repair work)
- Sandpaper & drill (for
mold repair work)
- Power washer (or car wash)
(or sand blasting equipment) (to periodically clean mold shells)
For Coral Transplant or Propagation
(Please refer to A Step by Step Guide to Reef Restoration Manual for any coral
work)
Antibacterial Soap: RBF Coral Team members must wash
their hands between each unique coral colony they touch with an antibacterial
soap. However, not all sites have fresh
water facilities to get a clean rinse so team members often use surgery rated
products that offer a clean rinse. An
example is LAGASSE, INC.’s “Antibacterial Lotion Soap” Contains 0.3%
Chloroxylenol (PCMX), a broad-spectrum degerming agent and offers gentle
cleansing with a clean rinse.
Alcohol-based or waterless hand cleaners can also be used,
but they don’t work well to remove some coral slimes…particularly oily type
slimes. Generally they can be used
between handling different colonies of the same species but it is best to use a
soap based product when changing species types.
 Battery
Cleaning Brush
or
Plug Hole Wire Brush: A small wire brush used to clean the inside of a
coral adapter plug hole if the artificial reef module has been deployed more than
a few days before planting a plug.
Battery
Cleaning Brush
or
Plug Hole Wire Brush: A small wire brush used to clean the inside of a
coral adapter plug hole if the artificial reef module has been deployed more than
a few days before planting a plug.
Bolt Cutters: Bolt cutters are used to fragment thick corals such
as Elkhorn, pillar corals and for extracting propagation “tears” from brain
corals.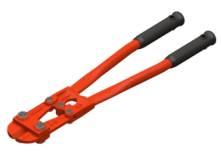
Bone Breaker: A tool used by surgeons to cut bone
during surgery that is used in the fragging process. It is particularly well adapted to the
thicker trunks of finger corals.
RBF Coral Antiseptic Dip: To reduce rapid tissue necrosis and other bacterial
infections that can occur due to the fragging wound, hard corals are dipped in
an antiseptic solution just before plugging.
The RBF version is a veterinary strength betadine or Lugol's
solution. It is possible to use over the counter
strengths but the amount needed will change the salinity of the dip and this
must be adjusted with artificial sea salt (available at any marine aquarium
store). Doing so will require a hydrometer
(specific gravity meter) or refractometer. Do not use fresh water to mix RBF Antiseptic dip. RBF Antiseptic dip must be diluted in fresh
seawater, Additionally it must be kept at the same temperature as the sea, and
may need to be buffered to the same pH as the natural seawater if maintained
longer than 2 hours. Salinity must
also be similar to seawater, but this will not be a problem if mixed with
seawater at the rate of 1 teaspoon per 8 ounces of seawater that is the normal
dosing rate for an average growth rate coral.
Very slow growing hard corals are dosed at a lower rate, Acropora and
other fast growing corals may need a slightly higher dosage rate. Soft corals are not usually treated. The only part of the coral colony that
should be exposed to the dip is the fragmentation injury site. This will be clearly visible as exposed
white coral skeleton. Proper treatment
will stain the white skeleton to a slightly yellow color. If a yellow color does not show up after
dipping, it is possible the corals have been over handled and the protective
slime coating generated during the handling has migrated over the exposed
skeleton. It is not necessary to remove
this slime to apply the dip because the slime itself is somewhat protective
against RTN but advise all coral handlers to reduce the coral stress
levels. Ideally, corals should only be
exposed to air one time during the entire process (when they are set into
the rapid setting coral plug cement).
Typically, over-slimed corals can be tracked back to careless
fragmenting…a procedure that must be carried out delicately to reduce coral
stress.
NOTE: Fire Corals and Soft Corals should NEVER be dipped in
iodine solution.
RBF Coral Epoxy Putty: A two part epoxy stick with a
specific viscosity that allows for easy underwater mixing, yet stiff enough to
hold coral plug in place until it hardens.
RBF coral epoxy putty comes in a 10-minute and a 30-minute setting
formulation. 10-Minute is better for
larger fragments that are prone to dislodging during wave surges but requires
more frequent mixing and is therefore less efficient and prone to waste. 30-minute formulation is standard. If you choose a non-RBF brand, be sure to
test that they are not toxic to corals.
(Testing can be done in a marine reef tank). (Do not use Devcon branded epoxy for that reason.) If the brand you choose is too thick, it
will be very time consuming and difficult to mix underwater. If it is too thin, it will not hold the
plugs in place. If it is too sticky, it
will be difficult to remove from your hands.
If not sticky enough, it will not bond well. Expect some staining of your dive suit and dive gear whatever
brand you choose.
RBF Coral Tool Kit: An orange colored tool kit that
contains items such as fragmentation tools (bone cutter, wire cutter, wire
stripper, bolt cutter, hack saw, etc.), latex gloves, RBF Coral Antiseptic Dip,
RBF Coral Epoxy Putty, RBF Plug Cement w/ADVA Flow, mixing sticks, container for mixing plug cement, medicine cups,
container for water/ADVA Flow mixture, submersible thermometer, container for antiseptic dip, oil free sun
block, antibacterial soap, battery
brush, hand brush, plug twine, dissolved
oxygen (DO) test kit and other misc. items that may be required for coral
propagation table operation.
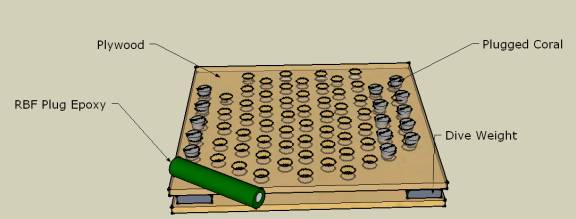
Coral Curing and Planting Tray:
A wooden tray designed to hold plugs during curing
under the coral propagation table and doubles as a carrying tray when inserted
into a plastic laundry basket or egg crate for planters. Embedded dive weights make the tray
negatively buoyant. (diagram below)
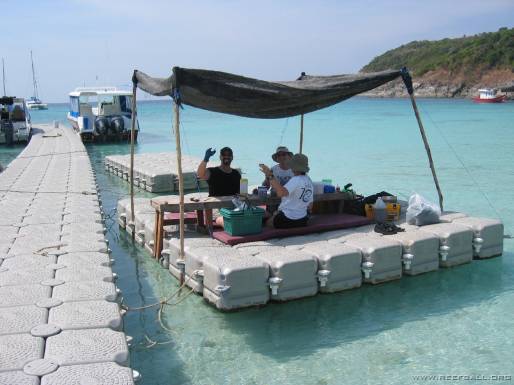
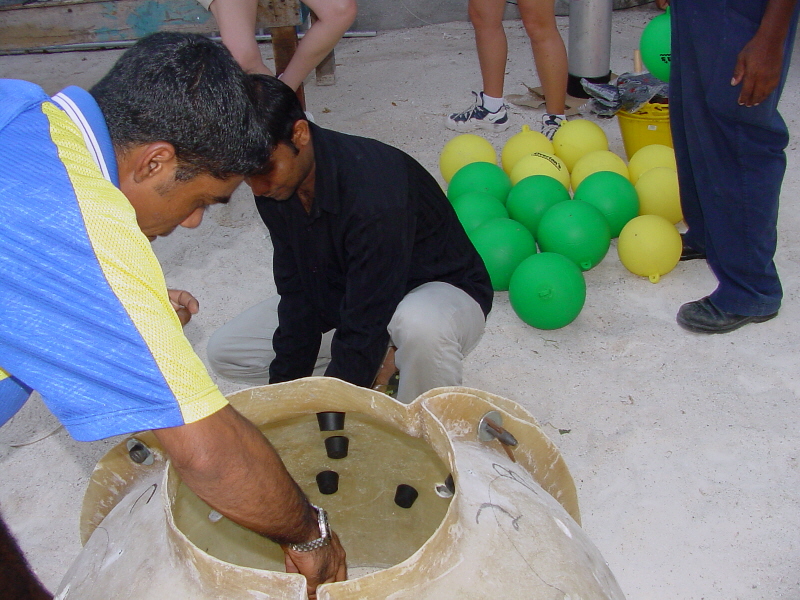
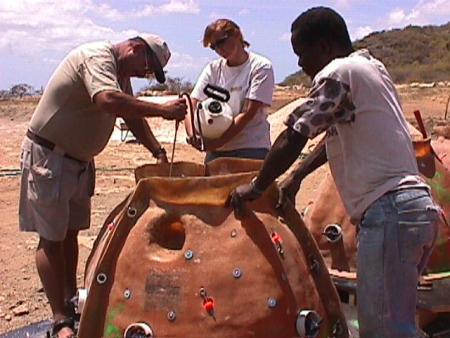
Coral
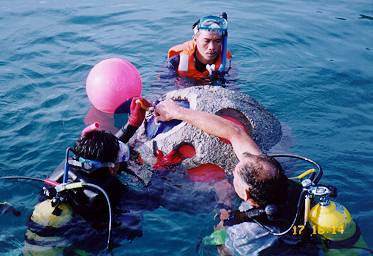
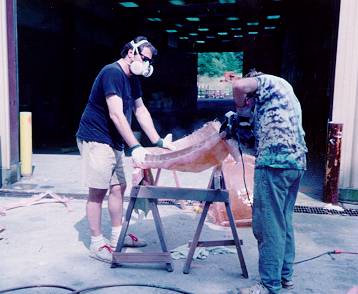
Propagation Table:
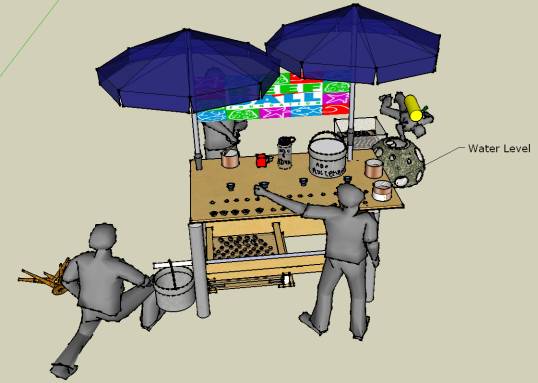
Either a beach based (as show above) or floating platform
(as shown below) used for fragging, plugging and plug curing.
A complete 3-d engineering plan can be obtained without cost by downloading
Google’s free Sketchup (www.sketchup.com)
then right clicking on the second icon from the right to “get model” and search
for keyword “Coral Propagation Table.”
An umbrella or tarp is necessary to shield coral fragments from sunburn. Careful attention should be made to ensure
table stability in waves. We have made
a wide variety of variations to accommodate individual project needs. It is important to consider the number of
coral propagations you plan, the conditions at the work site, and the number of
people that will be working before designing your table. A good table increases the comfort for human
workers and makes higher volume outputs easier but it can take longer to build
and be more expensive. A small table
workspace can be made just about anywhere but may be uncomfortable and slow for
production. If you are just
demonstrating the technology for a school, that might be sufficient. If you plan to do tens of thousand of
plugs.,.go high tech with all the bells and whistles. Cup holders are nice!
 Coral
Reference Books:
Coral
Reference Books:
 The
Coral Team uses Reef Coral Identification by Paul Humann and Ned Deloach
as a standard reference for the Caribbean and Corals of Australia and the
Indo-Pacific by J.E.N. Veron for the
Pacific. If you have deeper pockets,
Veron has a 3 volume Corals of the World series. Typically, the team will supplement with local reference books
depending upon location. Standard Coral Team culture is to use the common name
first, followed by the scientific name second, if known. This helps everyone to learn the scientific
names and does not embarrass those still learning.
The
Coral Team uses Reef Coral Identification by Paul Humann and Ned Deloach
as a standard reference for the Caribbean and Corals of Australia and the
Indo-Pacific by J.E.N. Veron for the
Pacific. If you have deeper pockets,
Veron has a 3 volume Corals of the World series. Typically, the team will supplement with local reference books
depending upon location. Standard Coral Team culture is to use the common name
first, followed by the scientific name second, if known. This helps everyone to learn the scientific
names and does not embarrass those still learning.
 Disaster
Nursery Supplies: After storms, ship groundings, anchor drops and other
disasters, there is often a significant amount of damaged corals and no
practical way to re-attach them. In
these cases, concerned divers can create a medium term disaster nursery to
preserve the coral genetics impacted by the disaster. These nurseries must be able to keep the corals alive long enough
to build and deploy the chosen artificial substrate and to activate a Coral
Team. A Disaster Nursery is designed
hold coral up to about one year. The
nursery is a very simple welded steel frame with “chicken” wire across the
upper surfaces. The shape is usually
triangular so that it can be tossed over a boat and will always lands
upright. Deployment is best over a
sandy, non-live bottom because you may need to anchor the nursery if it will be
needed for more than a few weeks. Screw
anchors available at hardware stores for anchoring sheds can be used on sandy
bottoms and screw into the seafloor easily.
Disaster
Nursery Supplies: After storms, ship groundings, anchor drops and other
disasters, there is often a significant amount of damaged corals and no
practical way to re-attach them. In
these cases, concerned divers can create a medium term disaster nursery to
preserve the coral genetics impacted by the disaster. These nurseries must be able to keep the corals alive long enough
to build and deploy the chosen artificial substrate and to activate a Coral
Team. A Disaster Nursery is designed
hold coral up to about one year. The
nursery is a very simple welded steel frame with “chicken” wire across the
upper surfaces. The shape is usually
triangular so that it can be tossed over a boat and will always lands
upright. Deployment is best over a
sandy, non-live bottom because you may need to anchor the nursery if it will be
needed for more than a few weeks. Screw
anchors available at hardware stores for anchoring sheds can be used on sandy
bottoms and screw into the seafloor easily.
Try to collect enough fragmentable coral for 3 plugs from
each adult coral colony that is impacted.
If possible, create 3 separate nurseries, duplicating the original
effort in case a storm or other unforeseen accident occurs on one of the
nurseries. If possible, use digital
still photography and a monitoring frame to record the donor colony and
the fragable coral saved. Attach the
coral to the chicken wire using zip ties or wire. Make sure each colony does not touch a surrounding colony, and
allow for growth depending upon the length of expected nursery stay. Look for the healthiest coral tissues
possible and do not nursery any diseased corals. You can use the area under and around the nursery to store
smaller adult colonies that need to be re-attached by hydrostatic methods such
as softball or smaller brain corals.
 Dissolved
Oxygen (DO) Test Kit: Lamotte makes
one of the most easy to use DO kits and it typically can be found for under
US$50. Be sure to follow instructions
carefully to get an accurate measurement.
A dissolved oxygen test is used
to confirm DO levels are over 4.5 mg/l in which case it is safe to conduct
coral fragmenting and coral table operations.
Dissolved
Oxygen (DO) Test Kit: Lamotte makes
one of the most easy to use DO kits and it typically can be found for under
US$50. Be sure to follow instructions
carefully to get an accurate measurement.
A dissolved oxygen test is used
to confirm DO levels are over 4.5 mg/l in which case it is safe to conduct
coral fragmenting and coral table operations.
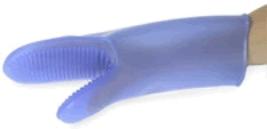 Fire
Coral Mitt: Fire corals (Millapora) are sometimes desirable to propagate
due to the types of fish that use them for protection. Simple latex gloves can tear when performing
hand fragmentation (fragmentation without a fragmentation too). The Reef Ball Coral Team occasionally uses a
special silicon mitt for this task. Typically,
Reef Balls are planted monolithically with fire corals and only a few plugs are
required because most fire corals grow and spread very fast. In a calm sea, just laying a few fire coral
fragments on a Reef Ball may be enough to get them started even without
plugging.
Fire
Coral Mitt: Fire corals (Millapora) are sometimes desirable to propagate
due to the types of fish that use them for protection. Simple latex gloves can tear when performing
hand fragmentation (fragmentation without a fragmentation too). The Reef Ball Coral Team occasionally uses a
special silicon mitt for this task. Typically,
Reef Balls are planted monolithically with fire corals and only a few plugs are
required because most fire corals grow and spread very fast. In a calm sea, just laying a few fire coral
fragments on a Reef Ball may be enough to get them started even without
plugging.
Hand Brush:  A
hand wire brush is used to clean the area adjacent to the coral adapter plug
whole before planting on an artificial reef module that has been deployed for
more than a few days. This provides
space for the coral to base and attach itself to the artificial substrate.
A
hand wire brush is used to clean the area adjacent to the coral adapter plug
whole before planting on an artificial reef module that has been deployed for
more than a few days. This provides
space for the coral to base and attach itself to the artificial substrate.
Hacksaw: 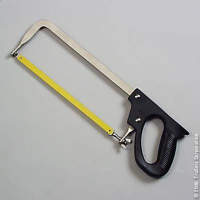 Sometimes compression tools cannot be used
and a hacksaw is needed for fragmenting.
A hacksaw can also be used to make a scar line so that compression
cutting follows the line.
Sometimes compression tools cannot be used
and a hacksaw is needed for fragmenting.
A hacksaw can also be used to make a scar line so that compression
cutting follows the line.
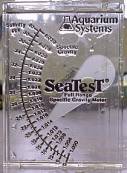
Hydrometer or
Specific Gravity Meter:
A hydrometer is an
inexpensive way to approximate salinity or the amount of salt dissolved in
seawater. You can get one at any saltwater marine aquarium store. It can be used to check the salinity of the
Antiseptic dip if you are not using veterinary strength solutions. It can also be useful if you are working
where freshwater runoff can affect the conditions at your nurseries or coral
propagation table.
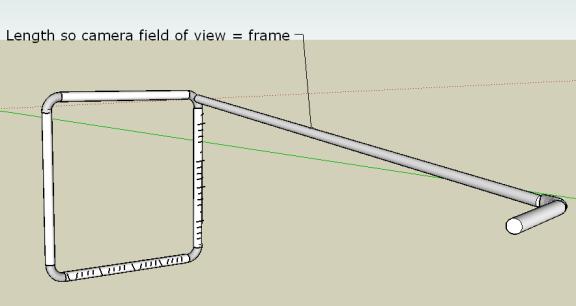
Monitoring Frame: A PVC camera guide marked with
metric and English scales. Used to
position the camera over coral plugs to take standardized monitoring
photos. Advanced users will add movable
“luggage tags” with numbers or letters to encode variables such as artificial
reef module identifier, date, or coral colony identifier. Length of rod varies by camera used. Length should be adjusted with camera in
wide-angle (non-zoomed) position. When
taking monitoring photos make sure camera is in the same position. Most monitors prefer a frame that is neutral
or slightly negatively buoyant. Gravel
can be put inside the frame for this purpose.
Frame should have small holes drilled into it for water to flow in and
out.
Oil Free Sun Block: RBF Coral Team members are
required to protect themselves from sunburn.
Loss of a team member function due to sunburn can disrupt typically
tight project timelines. However, most sun
care products contain oil that can contaminate the coral propagation
table. Therefore, Team members are
required to use Oil Free Sun Blockers (typically in spray formats that make
frequent applications easier). A
commonly used brand is Neutrogena Healthy Defense Oil-Free Sun block Spray, SPF
30 or higher.
RBF Plug Cement: A
mixture of hydrostatic cement and microsilica and optional proprietary
ingredients used for plugging. Here’s the label on
the bucket:
RBF Disk & Plug
Mix
·
Makes Disks or Plugs for use with the
Special holes created
in your Reef Balls
by the coral
attachment adaptors
· Can
also be used to attach plaques, scientific
markers, etc. to Reef Balls.
· Can
be used for in situ coral resetting (Hydrostatic Method)
·
Contains WR Grace Force 10,000
· Sets
in 3 minutes
· Can be used for one step
creation of a plug with a live coral
fragment embedded in the mix.
|
Warning! Skin and
eye irritant. May contain silicon dioxide, silica fume, very finely ground Portland
cement, crushed coralline algae, calcium hydroxide, sugar and/or Adva
Flow. Your skin may be sensitive to
cement. Wearing rubber gloves is
recommended. Avoid contact with eyes
or prolonged contact with skin. In
case of contact, flush thoroughly with water. For eyes, flush with clean water for at least 15 minutes and
get prompt medical attention. Keep out of reach of children. Warning!
Contains silica fumes and silicon dioxide, do not breath dust. Prolonged
exposure to silicon dust can lead to siliceous of the lungs. We recommend wearing a dust mask when
working with silica fumes or this product. Eye protection is also
recommended.
|
For use at an RBF
Coral Table to embed corals, use mixing instructions from your table boss for the
specific type of coral you are working with.For making plugs for non-embedded
attachment of corals:: Add 3 drops
of W. R. Grace ADVA FLOW high range
water reducer and super-plastisizer (contained within the package in a 1 oz
bottle) to 3 oz by volume of product.
Prepare your disk or plug mold (4 disks or 2 plugs) and then add with 1
oz of water. Mix rapidly and completely
and pour IMMEADIATELY into your disk or plug molds. De-mold in 3 minutes and place in fresh water for curing
overnight before attaching hard or soft corals.
Attaching Corals to
Disks or Plugs that CANNOT be embedded:Disks prepared with this product can be
used as a base to attach hard and soft corals with a variety of methods. These include RBF Super Glue Gel, Bridal Veil
method (fleshy soft corals), monofilament method, and others. For all these attachment methods, allow
coral to grow out over the plug for a natural attachment in a protected area
before attaching plug or disk to your Reef Ball.
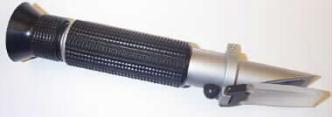 Refractometer:
A refractometer is a more sophisticated way than indirect specific gravity
meters to measure exact salinity or the amount of salt dissolved in seawater.
They don’t suffer from different reading in different temperature ranges
either. They are available from professional environmental monitoring
suppliers. It can be used to check the
salinity of the Antiseptic dip if you are not using veterinary strength iodine solutions. It can also be useful if you are working were freshwater runoff
can affect the conditions at your nurseries or coral propagation table. A refractometer is very useful for Red
Mangrove projects because salinity must be closely monitored. Simply put a drop on the lens of the water
you want to sample and look into the scope for the reading. Note: Must be calibrated with distilled
water before use.
Refractometer:
A refractometer is a more sophisticated way than indirect specific gravity
meters to measure exact salinity or the amount of salt dissolved in seawater.
They don’t suffer from different reading in different temperature ranges
either. They are available from professional environmental monitoring
suppliers. It can be used to check the
salinity of the Antiseptic dip if you are not using veterinary strength iodine solutions. It can also be useful if you are working were freshwater runoff
can affect the conditions at your nurseries or coral propagation table. A refractometer is very useful for Red
Mangrove projects because salinity must be closely monitored. Simply put a drop on the lens of the water
you want to sample and look into the scope for the reading. Note: Must be calibrated with distilled
water before use.
Secchi Disk: An 8 inch disk with alternating black
and white quadrants used to determine a standard visibility in water.
Markings or knots on the rope normally signify
distance. The disk is lowered into the
water until it disappears and the depth recorded, then raised until it
re-appears and the depth recorded. The
two depths are averaged and this becomes the Secchi visibility. Usually, the color of the water is also
noted.
Submersible Thermometer  A
thermometer is used to check the temperature of the antiseptic dip and to check
the nurseries & coral table plug curing areas. The thermometer is also used to take ambient water temperatures
to make sure temperatures don’t exceed 30C (86 degrees Fahrenheit) which is the
point were fragmentation and plugging activities need to be stopped unless a
Dissolved Oxygen test can be conducted to confirm DO levels are over 4.5 mg/l
(in which case it is possible to continue).
If a DO test kit is not available, a rule of thumb is that If it is
windy and there is good circulation it will probably be okay, if it is calm or
poor circulation it is likely dangerous to proceed. In fact, on calm days or in low circulation environments DO
testing should begin at 28 C or 81 degrees Fahrenheit.
A
thermometer is used to check the temperature of the antiseptic dip and to check
the nurseries & coral table plug curing areas. The thermometer is also used to take ambient water temperatures
to make sure temperatures don’t exceed 30C (86 degrees Fahrenheit) which is the
point were fragmentation and plugging activities need to be stopped unless a
Dissolved Oxygen test can be conducted to confirm DO levels are over 4.5 mg/l
(in which case it is possible to continue).
If a DO test kit is not available, a rule of thumb is that If it is
windy and there is good circulation it will probably be okay, if it is calm or
poor circulation it is likely dangerous to proceed. In fact, on calm days or in low circulation environments DO
testing should begin at 28 C or 81 degrees Fahrenheit.
Sugar: Sugar acts to slow down the setting speed of
concrete (retarder) and it can be used in cases where the fast setting plug
cement goes off too quickly. Sugar
water is used on concrete artificial reef molds to create a rough surface
texture with exposed aggregates that encourages natural settlement of larval
corals (the surface must be rinsed with
water immediately after de-molding to gain this effect).

Waterproof Papers and Field Books: Coral Team members often need waterproof
paper for underwater monitoring forms and field books for recording data. You will find these and other specialty
field items like sand grain distribution sorters, refractometers, and survey
equipment at http://www.forestry-suppliers.com/

Wire Cutters: A tool used for fragging, typically for
small finger corals.
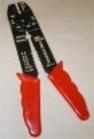 Wire Strippers: A tool used during the fragging process for
woody-stemmed soft corals (gorgonians).
This tool is used to strip back the flesh at the base of a propagated
stem exposing enough of the woody stem to be embedded in the plug for a firm
attachment. Care must be taken to hold
the soft coral broadly so that there is no crush injury. Automatic wire strippers can be used on some
soft coral types to avoid this potential injury.
Wire Strippers: A tool used during the fragging process for
woody-stemmed soft corals (gorgonians).
This tool is used to strip back the flesh at the base of a propagated
stem exposing enough of the woody stem to be embedded in the plug for a firm
attachment. Care must be taken to hold
the soft coral broadly so that there is no crush injury. Automatic wire strippers can be used on some
soft coral types to avoid this potential injury.
Comply with all OSHA and all other regulations. You'll need at a minimum
safety glasses, rubber gloves, hard hat, lung protection, steel toed shoes,
protective clothing, and a first aid kit.
We suggest the following extra parts as a "SAVE A REEF BALL KIT"
Note that all molds systems sold after June 2002 have mold spare parts (bolded)
automatically included.
- Screw Caps
- Tether Balls
- Side Polyforms (A-0's)
- Hollow Pins/PVC Collar
- Wedges
- Washers
- Pins (5&3 inch)
- Plates
- Internal Bladders
- Duct Tape
- Ball of string
- Fine mist sprayer (Garden
pump up type is best)
- Some old newspapers or
empty concrete sacks (used to plug holes where concrete is leaking in case
of a forgotten pin or base that is wearing out).
The following diagram will help you identify parts and part names.
 Assembly
(Newest systems have mold size appropriate square plates)
materials(apendix1)_files
<--Click here for photos of parts
|
What is Concrete Slump
Concrete slump is a measure of how thick the concrete is. Imagine a cone
used to mark highways that is 15 inches tall is filled with concrete.
Place this on the ground and remove the cone....the number of inches that the
concrete "slumps down" is the "Slump"...so a 9 inch slump
is very liquidly where a 2 inch slump is almost clay like. Testing with
a slump cone is one way to determine if you have the right slump for pouring
your molds...but with experience you will know from how the concrete looks
and pours into your molds.
|
Molds can be used with any concrete mix that meets these basic requirements:
- Type II Portland Cement
(only “marine grade” type II should be used or add an additional 10 pounds
of microsilica per yard of concrete)
- 5-7 Inch Slump (Super &
Golieth Sized Molds), 6-8 inch slump (Ultra Ball) 7-9 inch slump (Pallet
Ball and all smaller sizes) (Use ADVA flow 140 [6 ounces per 100 lbs
of Portland cement] or ADVA flow 120 [3.5 ounces per 100 pounds of
Portland cement]. To create the slump, NOT water). If ADVA is not available,
a high range water reducer and plastisizer can be used but results....in
particular biological results may vary. If you don’t use Adva, add a
commercial air entrainer to achieve 4% +or- 2% of air entrainment.
ADVA is used to maintain a high water/cement ratio for stronger concrete
that does not contain too much water and ADVA aids in getting a complete
concrete reaction so the pH of your Reef Ball is better for coral, oyster,
and other fouling community growth.
Adva also adds about 4% air entrainment which aids in microsuface
texturing of your Reef Ball.
- Microsilca, any densified
brand will do (see appendix K for list of available compatible brands).
- Sand, any sand type is
permissible but it should be salt free (often called washed sand).
- Any size aggregate will do, but
pea gravel/smaller aggregate is recommended for easy casting for Bay Ball
and smaller units. (over 1 inch may make casting very difficult in the
smaller sized molds).
-Aggregate/Slump Adjustment
1) If Aggregate used is round and smooth, subtract 1 inch from recommended
slumps
2) If Aggregate is larger than pea gravel, but less than 1 inch add 1/2 inch to
the recommended slumps
3) If aggregate is 1 inch (or larger), add 1 inch to recommended slumps
4) If aggregate is square or mixed in sizes and jagged, add 1 inch to the
recommended slumps
5) If final slump is higher than the recommended range for Super Ball or larger
sized mold pouring, pour the larger balls in two stages with 30 minutes between
pouring to avoid a cold joint but to allow for less upward pressure on the
center bladder caused by high slump mixes. Use caution with Ultra sized
Reef Balls with high slump mixes as the center bladder might rise and make an
Ultra Ball with a very heavy bottom and thin top.
- Limestone aggregate is best
for coral settlement, granite or river rock has a higher density for
projects where maximum stability is desired.
- Harder aggregates are
better for non-coral rich waters (they make stronger concrete)
- PSI (compressive strength
measured in pounds per square inch) at the time of use of at least:
|
|
Super/Ultra/Reef
Ball
|
Pallet Ball
|
Bay Ball and all
smaller sizes
|
|
Floating
Deployment
|
6,500+
|
6,000+
|
5,000+
|
|
Barge Deployment
|
6,000+
|
4,500+
|
4,000+
|
|
To remove from
mold
|
750+
|
750+
|
750+
|
|
To lift from
base
|
1,500+
|
1,200+
|
1,000+
|
THESE ARE RECOMMENDED STRENGTHS-NOT SPECIFICATIONS. THEY ARE
INTENDED TO REDUCE BREAKAGE WITH TYPICAL HANDLING PROCEDURES. BARGE STYLE DEPLOYMENTS
MAY TOLERATE LOWER STRENGTHS WHEN HANDLED PROPERLY. FLOATING DEPLOYMENTS SHOULD
BE VERY CAUTIOUS OVER NATURAL REEFS WHEN STRENGTHS ARE LESS THAN RECOMMENDED
REQUIREMENTS. EXPERIENCED USERS MAY FIND THAT REMOVAL FROM THE MOLDS AND BASES
CAN BE ACCOMPLISHED AT SLIGHLY LOWER STRENGTHS IF CARE IS TAKEN.
- These recommended strength
requirements assume standard weight modules.
In general, the less Portland Cement used the better the pH will be, so if
you can get away with a lower PSI concrete mix design and not experience
breakage it is better for coral settlement. However you should always
maximize microsilca use and minimize concrete use to get the desired PSI.
Microsilca can double the strength of any PSI mix design.
The concrete MAY NOT use any of the following:
- Fly Ash, unless it is
proven non-toxic and without elements that are biologically active
- Any accelerator or mix
design where it is possible to demold without breakage before 4
hours. 7 Hours or more is recommended to demolding and the concrete
should still be soft to develop a good surface texture. Slower
setting concrete yields a lower final pH and is better for biology.
Concrete mixes that set up faster than 4 hours will ruin the molds and inflatable
parts much faster due to the high heat buildup of faster setting mixes.
NOTE: Authorized contractors, only, may demold in 2-3 hours if molds
are attended and the accelerator or mix used is a "High Early"
type. Modules must be cooled by water as soon as they are demolded
and cured in a plastic wrap for at least 24 hours. This method will lead
to additional mold wear and tear.
- Surface Retarders except
for table grade white or brown sugar and water is approved as a surface
retarder.
- Silicone Sprays (the propellant
can damage the tether balls and the silicone can prevent certain types of
marine life settlement)
- Admixtures that contain
toxins or biologically active elements (including iron and fertilizers)
- Rebar, except for use in
ocean environments where iron is not considered biologically active
(abundant) [Fiberglass rebar CAN BE used. Bamboo, palm fronds (stem
part), and other organic re-enforcement MAY be used) ]
- Form oil or release
agents/waxes, unless proven to be non-toxic and biodegradable before deployment
and then only for features such as anchors and not for mold shells.
Use Lard for releasing agents for build in anchors or other
non-biologically exposes surfaces if needed.
- ANY OTHER PRODUCTS THAT
CONTAIN PLASTICS OR PETROLEUM PRODUCTS (Failure to avoid plastics and
petroleum can be considered a violation of the MARPOL act)
The mix design could use the following:
- Optionally, Non-Calcium
chloride accelerator or W.R. Grace Daracell (added during cold
weather or to speed up de-molding but not to speed up demolding earlier
than 4 hours, (NOTE: Authorized Contractors may demold in as little as 2
hours with High Early accelerators.
To avoid too much mold damage, remove molds as quickly as possible,
the Reef Ball must then be water cooled to slow down the cement reaction
and wrapped in plastic for at least 24 hours. Expect extra mold wear and tear, especially for inflatable
parts). Don’t add accelerators
until JUST before casting.
- W.R. Grace's ADVA Flow 120
or 140 (121 in Europe or other numbers possible indicating concentration
and length of retarding effect due to local temperature) is HIGHLY
RECOMMENDED (ADVA gives good fluidity to the concrete making casting easy,
adds the correct amount of air entrainment without another admixture, and
give a better final pH value)
- If ADVA is not available
and another high range water reducer is used, you will need an air
entrainers or Darex II by W.R. Grace (Add to achieve 4% +-2% air
entrainment)
- A coat of saturated sugar
water sprayed from a fine mist sprayer ( as a surface retarder and form
release agent)
- Microsilica (A.K.A.
densified silica fumes) or W.R. Grace's Force 10,000 (see note below)
A special note on the pH of concrete and microsilica:
Most concrete will come out of the mold with a pH of 12-16. Over time, in a
fresh water bath or when exposed to rain, the pH will begin to fall. The pH of
the ocean is between 8.3 and 8.4 and many marine species will not take up
residence on the modules until the pH at the surface of the reef balls is at or
near of the pH of the surrounding environment. This is particularly true for
hard corals that are very pH sensitive in their larval stages. The use of
microsilica at a MAXIMUM of 30% to the weight of the Portland cement used will
bring the pH of reef balls submerged in an open oceanic system within range for
nearly immediate settlement by corals (at 30% most calcium hydroxide will be
reacted and the permeability of concrete is very low). However, 30% is not cost
effective and through extensive testing, we have found that 10% is the most
practical in terms of a cost/benefit ratio. Less than 30% by weight to
Portland will still give a marked decrease in surface pH and is highly
desirable. We recommend 50 pounds per yard to be used for deployments where
hard corals are targeted for recruitment. When microsilica is not used, and you
intend to place your modules in waters that support hard corals, several months
in the rain or several weeks in a fresh water bath are suggested to increase
coral growth...this will at least reduce the amount of unreacted calcium
hydroxide which creates very high pH but it will not increase the permeability
of your concrete. . Microsilica also has a strength benefit. Fifty pounds of
Microsilica per yard of concrete will generally double the PSI of the starting
mix. Anytime you use more than 50 pounds of Microsilica per yard of concrete,
you should add fibers to the mix to avoid micro cracking that is common to high
microsilica concrete mixes because it makes concrete shrink when curing.
|
pH
and Microsilica....a Scientific Explanation;
The scientific explanation of why microsilica gives a better pH for coral
settlement is a bit complex. There are two factors at work. 1st, when
concrete reacts, it forms cement (pH of about 12) and a left over byproduct,
calcium hydroxide (pH of about 14-16+). Microsilica directly reacts
with calcium hydroxide to form a second kind of "glue" which is why
microsilca concrete is stronger than regular concrete. This gets your
concrete to a much lower pH to start with.
However, Microsilica doe not change the pH of the concrete, per say, but
rather affects the permeability of concrete which affects the rate at which
negative ions (pH is a measurement of ion concentration) leach from
concrete. Therefore, in a closed system microsilica would only delay
reaching a pH equilibrium of the concrete, whereas in an open oceanic system,
the delay results in lower pH at the surface of the concrete where corals
settle.
It has been scientifically
documented (<--click here for report) that settlement by marine life
is closer to natural settlement rates on Microsilica concrete compared to
regular concrete.
|
Some clients resist the use of microsilica because it can increase the price
of a yard of concrete by as much as $20-30. However, there are a few other
benefits that should be considered before making the decision not to use
microsilica. First is the durability and abrasion resistance of concrete. Salt
water ions are hard on concrete and over time will degrade concrete.
Microsilica reduces the permeability of the concrete and helps it resist ionic
attack. Microsilica also increases the abrasion resistance of concrete. For
this reason, microsilica increases the expected life of the reef. With a full
dose of 50 or more pounds per yard, one can expect the modules to last well
over five centuries (engineering life) even in waters where hard corals do not
exist to build up the modules (hard corals help the modules to develop natural
abrasion resistance). With 25 pounds per yard, once can still expect durability
to last over 2 centuries. With 10 pounds per yard, one could expect about 100
or more years. Without microsilica the durability of concrete can decrease in
just 20-40 (5-15 for Type I concrete) years. Another important consideration is
breakage. Heavy equipment and rough barge deployments (including dropping
modules on top of each other) can break modules. The more microsilica used, the
more resistance to breakage your modules will have. (This is more important
with Reef Balls than other concrete structures that contain rebar for breakage
resistance.) Given the time and effort it takes to build a reef, a small
investment in microsilica can really payoff in terms of the number of modules
that make it to the site intact.
Freshwater applications do not benefit as much from the reduced pH since
freshwater reefs function mainly as fish shelters or current reduction devices
rather than the basis for a food chain. However, algae and other life that
attaches to freshwater reefs may still be important and the other benefits of
microsilica certainly make it worth considering.
|
CASE STUDY- REEF BALL SCULPTURE PARK IN COZUMEL
In Nov. of 1995, Reef Ball supervised the construction of 15 artistic
sculptures to be used underwater along with 7 Bay Balls (two with sculptures
but into the top of the bay balls). Reef Ball supervised the first 6
sculpture and the 7 Bay Balls, then we left the remaining 8 sculptures to be
built by artists. In Aug. of 2002, we monitored the site. The 7
Bay Balls and first 6 sculptures all had 100% hard coral cover and were in
perfect shape, the remaining 8 sculptures built after we left had all
collapsed with only rubble on the ground. What happened? They
stopped using Micro silica and the other Reef Ball admixtures to save
money. The total project budget, using all volunteers was $50,000...1/2
the sculptures were lost within just a few years to save maybe $500 in
concrete admixtures...get the point?
|
Many of our clients use EOD (End of Day) waste to construct Reef Balls as a
way of saving money on concrete, and as a way of using a material that would
otherwise go to our landfills. Since the year 2000, this practice has been
declining because concrete companies are getting more efficient at recycling
and avoiding waste. If you are lucky
enough to have some available, here are some general guidelines for EOD waste:
- Do not accept concrete that
has a temperature of over 115 degrees Fahrenheit. This means it is too old
and will not develop the strength that is needed. Hot concrete also makes
it difficult to achieve a 9 inch slump.
- Make sure the starting mix
was at least 3,500 PSI. -Always add microsilica (we recommend at least 50
pounds per yard) unless microsilica was already in the starting mix. This
is because EOD waste may not have a complete concrete reaction that can
push pH levels to 14 or higher.
- Consider the addition of
extra Portland if the mix has a slump of more than 4 inches without a superplastisizer
or high range water reducer. Often, EOD waste has be watered down at the
original pouring site and this will reduce the ending strength unless you
add Portland to absorb the extra water. Portland cement can also be added
to low PSI mix designs for extra strength.
- Add superplastisizer (Adva
Flow 120) until you get a 9 inch slump.
- You may need to let EOD
waste cure a bit longer than purchased concrete to make sure the minimum
strengths for removal from the base are met.
Your molds need to be set up since they will be disassembled for shipping.
The first pour is usually accompanied by a Reef Ball trainer, but in the event
one is not present note the following:
1) New molds have a wax left on them from the fiberglass manufacturing
process; therefore the sugar water will not stick as well the first few
uses. We recommend two coats of sugar water on the mold surfaces
(allowing the first one to dry) before the first castings.
2) New molds will often make some cracking noises during the first few
uses...this is normal as the flanges break in...they are designed with some
spring to help them last longer in the field.
3) Inflate all inflatable before first use and check for leaks. We
cannot replace defective inflatable parts once they have been used in concrete
be careful when opening the boxes with the Polyform buoys so your box cutter
does not slice the buoys.
The molds do not come with the base needed for use (shipping
costs would be prohibitive). So your first task will be the assembly of a
plywood, steel or concrete base. (Also See Appendix For Concrete or Steel
Bottoms)
A base can be constructed of plywood, steel, or concrete, but plywood is
often used because it is portable, relatively inexpensive, and can be made with
readily available materials and tools.
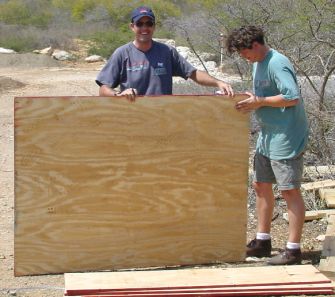 We recommend the use of
form-oiled plywood that is designed for building concrete forms and will not
stick to the concrete (sometimes referred to as Marine Grade Plywood).
Additionally, the oil inside the plywood resists weathering so your base will
last for hundreds of castings. (If form oiled plywood is not available, then we
recommend that you seal regular plywood with vegetable oil, lard, or other
non-toxic paint or finish.)
We recommend the use of
form-oiled plywood that is designed for building concrete forms and will not
stick to the concrete (sometimes referred to as Marine Grade Plywood).
Additionally, the oil inside the plywood resists weathering so your base will
last for hundreds of castings. (If form oiled plywood is not available, then we
recommend that you seal regular plywood with vegetable oil, lard, or other
non-toxic paint or finish.)
The first step is to build a flat surface of the following dimensions:
|
Super/Ultra/Reef Ball
|
Pallet Ball
|
Bay Ball, Mini-Bay, Lo Pro or Oyster
|
|
8 feet Square
|
5 Feet, 6 Inches Square or 8 feet Square
|
4 Feet Square
|
Since plywood is usually available in 4 feet by 8 feet sections, Bay Ball and smaller molds bases surfaces by
cutting a single sheet of 3/4 inch form oiled plywood in the appropriate size.
However, Pallet Ball and larger molds need overlapping sheets (double thick)
and using deck screws to join them. We recommend 3/4 inch plywood but close
metric sized will also work. Pins heads will require countersinking on
the bottom layer of plywood and will be “sandwiched” in place. Therefore if you plan to use more than one
base for each mold, don’t forget to order additional pins.
IF YOU ARE BUILDING ON A COMPLETELY FLAT SURFACE (SUCH AS CONCRETE) YOU
DO NOT NEED TO ADD THE LUMBER ACROSS THE BOTTOM FOR SUPPORT. IF YOU ARE
BUILDING ON SAND OR OTHER UNEVEN SURFACE THEN PROCEED WITH THE LUMBER
INSTRUCTIONS BELOW.
These diagrams on the next few pages are one (very old) example of a way to
build bases for uneven surfaces...note some of the " and ' markings are
reversed by accident. We HIGHLY recommend that you wait for your trainers
to build bases as redoing them is time consuming and sometimes a waste of
materials.

(View: Upside Down Aerial)
(View: Upside Down Aerial)
or SCREW YOUR BASES TO OLD WOODEN PALLETS
AND SCREW THEM DOWN TIGHT WITH FLAT HEAD SCREWS.
The plans shown are suggested requirements to be able to construct a full
range of Reef Ball sizes...in general if you are building heavier than normal
Reef Balls you can get away with LESS WELL BUILT BASES, and if you are building
lighter than normal reef balls you will need MORE WELL BUILT BASES (NOTE: THIS
IS COUNTER INTUITIVE BUT IT IS BECAUSE LIGHT BALLS REQUIRE MORE AIR IN THE
CENTER BLADDER THAT PUTS MORE PRESSURE ON THE BASES), and for long term
projects these are often exceeded. Also note that higher slump concretes put
more pressure on the bases than lower slump concretes.
These diagrams show various bases and will help you visualize how to make
bottoms. If you find yourself standing on the edges, you can also re-enforce
the overhanging plywood ledges with left over lumber. This is helpful on the
larger Reef Ball where it is sometimes easier to work inside the mold from the
platform. If you use 1/2 inch plywood, the re-enforcements are required for
strength. (Bricks or cinder blocks can be used for temporary re-enforcement.)
After you have finished constructing the bases, look carefully for exposed
nails, screws or splinters on the surface of your base. They can puncture the
center bladder. We do not recommend the use of nails, as they tend to work
their way up and can damage the center bladders.
After you have constructed your base, you will need to put your mold
together so it can be placed on top of your base to determine where to drill
the holes for the pins. (NOTE: If you are "sandwiching" in the
short pins, you will have to mark the holes for the pins and drill before you
finish assembling your bases)
(View: Upside Down Plan View)
Depending upon the size of your mold, there are up to 3 different side balls
that must be attached, A-0, A-1 Polyforms and tether balls. Tether balls fit
the 1 1/4 inch holes drilled into the sides of the fiberglass mold panels.
Start from the inside of the mold and push the pin (bolt) attached to the
tether ball through the hole. From the outside of the mold, pull the tether
until the knob with a hole in it is  sticking
out of the hole. Put the pin through the hole in the knob and the tether is
locked in place.
sticking
out of the hole. Put the pin through the hole in the knob and the tether is
locked in place.
If you want to remove a tether ball to make a more solid wall, or if
you are waiting on a replacement for one that has broken, just place duct tape
over the hole on the inside and the outside. (Yes, that will really hold the
liquid concrete in.) Polyforms need to be attached to the side panels.
Polyform A-0s and A-1s fit the larger 3-1/2 inch holes, and the A-1s fit
the 6 inch holes in the mold panels. To attach a Polyform, insert the top of an
inflated Polyform (not over inflated, just with enough air to take the folds
out of the ball) from the inside to the outside of the mold. Place a PVC collar
around the knob from the outside of the mold and insert a hollow tube pin
through the hole in the knob. It is helpful to have someone pushing on the
Polyform from the inside to make insertion of the pin easy. A screwdriver for
leverage and a hammer to tap the hollow tube pin is helpful.
Tether balls are inflated with a needle valve and an air compressor.

For mold use, the tethers should be at "normal" inflation
levels. Tethers should be soft enough to grab with one hand and you
should be able to squeeze the ball with one hand to make an indention. This
will insure an easy removal from the module.
If your mold has Polyform side balls, you don't need to worry about ease of
removal because they are deflated before the mold panels are removed.
Polyform A-0s & A-1s are inflated (to about 8-13 inches for the
A-0, 13-16 inches for A-1s ) by unscrewing the screw caps and adding air by a
compressor. The side Polyform balls have a one way valve in them so that they
stay inflated even before you put the screw cap back on them. (However,
always put the screw caps back on before casting because even a small leak can
ruin the hole and perhaps trap the Polyform in the concrete.) Near the
bottom of the molds, you'll want to inflate them a bit more to make sure the
hole they create goes all the way through the module's wall. HOWEVER, ONCE YOU
OVER INFLATE A POLYFORM, IT WILL DEVELOP A "MEMORY" AND WILL TEND TO
INFLATE TO THE LARGER SIZE FROM THEN ON. If you want a large hole, you can put
as much as 10% more air than normal to make them up to 14 inches across.
Remember that it's a one way trip, so be sure that's what you want. WARNING: IF
YOU ATTEMPT TO INFLATE A-0s TOO MUCH, THE VALVE MAY EXPLODE BACK AT YOU LIKE A
BULLET. IT IS POSSIBLE TO GET MORE THAN 10 INCHES, BUT SAFETY PRECAUTIONS
SHOULD BE TAKEN.
In order to let air out of the Polyform A-0s or A-1s, just insert
the blunt deflation pins that come with your molds
(Don't use sharp objects as they can damage the one-way valve).
If you somehow manage to get a hole in one of your center bladders, Polyform
does make a patch kit but it is doubtful (especially with Reef Ball or larger
molds) that you will be able to use it again for center bladder casting...still
it may be saved for marine bouy use.. If you need to get a patch kit, you
should be able to find one in any local marine store that carries Polyform
buoys. If you need to find the closest distributor to you, then call Polyform
directly at (800) 423-0664. All of the folks out there in Kent, Washington are
friendly and can help. We have also had some luck using Marine 5200
adhesive...any marine store should have it. Clean the hole well then
scratch the surface with a knife. Then put one coat of 5200 on the hole
with the ball deflated, wait 7 days, then inflate only to shape (not much
pressure) and put a second coat. Wait 7 more days before using in your
mold. They make a version of 5200 (Red) that sets up in a few hours...we
have not tried that yet but it's probably a good bet if you are in a hurry to
get back into production. We also usually put some Vaseline over the last
layer of adhesive so that in the mold the concrete does not pull on it if you
are going to try to re-use the bladder in a mold.
Note: A sales pitch for Polyform...In our development days we tried nearly
everything possible for our center bladders. We even had custom lift bags
designed to look like a space capsule. But, everything we tried failed. The
lift bags leaked at all of the seams. We tried other buoys and they split at
the seams every time. Then we found Polyform. Without a doubt, they make the
toughest buoys on the planet. If you ever need a buoy for any purpose, then we
highly recommend Polyform. (And by the way, they didn't pay us anything or give
us any special discounts to say this...really.)
 The
first step after the side balls are attached is to pin your molds together. New
molds are marked so that if you line up the "A" from one panel with
the "A" from the second panel, and so on, then your molds will be
together correctly. If they are used and the markings have faded, don't
fret--it's easy to figure it out since the holes will only line up one way. Assemble
the molds on a flat surface, preferably the new mold base you just built. Put a
washer on EACH side of the 3 inch pins and the insert the steel wedge on the
left side of the flange (right side if you're left handed). Without
washers on both sides, it is very possible to tear right through the fiberglass
flange during a pour. Don't tap the wedge in with a hammer until you get the
entire mold together. (If you do, then the last flange may be difficult to get
together without the help of another person because the mold is designed to
have some spring on it for easy removal from the concrete.) Now, go back and
tap each wedge down so the flanges are firmly together. (If you ever use a mold
vibrator or have to tap the molds excessively with a rubber mallet to get the
concrete in, then be sure and re-tap these pins afterwards because vibrations
can work them loose. But note we DO NOT recommend mold vibrators)
The
first step after the side balls are attached is to pin your molds together. New
molds are marked so that if you line up the "A" from one panel with
the "A" from the second panel, and so on, then your molds will be
together correctly. If they are used and the markings have faded, don't
fret--it's easy to figure it out since the holes will only line up one way. Assemble
the molds on a flat surface, preferably the new mold base you just built. Put a
washer on EACH side of the 3 inch pins and the insert the steel wedge on the
left side of the flange (right side if you're left handed). Without
washers on both sides, it is very possible to tear right through the fiberglass
flange during a pour. Don't tap the wedge in with a hammer until you get the
entire mold together. (If you do, then the last flange may be difficult to get
together without the help of another person because the mold is designed to
have some spring on it for easy removal from the concrete.) Now, go back and
tap each wedge down so the flanges are firmly together. (If you ever use a mold
vibrator or have to tap the molds excessively with a rubber mallet to get the
concrete in, then be sure and re-tap these pins afterwards because vibrations
can work them loose. But note we DO NOT recommend mold vibrators)
Now set your mold on the base and center it up. You will need to drill holes
in the middle of the oval hole in the hold down plates when they are spaced
evenly and positioned tightly against the bottom of the mold overlapping
completely the bottom mold flange.. Each mold size will require a different
number of plates per fiberglass panel. The number of plates needed is as
follows:
|
Super/Ultra/Reef Ball
|
Pallet Ball
|
Bay Ball
|
|
4 (4") plates per panel
|
3 (4") plates per panel
|
2 (4") plates per panel
|
|
(16 plates total)
|
(9 plates total)
|
(6 plates total)
|
|
OR
|
|
3 Triangular Plates per panel
|
2 Triangular Plates per panel
|
1 Triangular Plate per panel
|
|
(12 Triangular plates total)
|
(6 Triangular plates total)
|
(3 Triangular plates total)
|
NOTE: Triangular plates are heavier, but require a bit less labor.
Determine which style you have before drilling your bases. Also,
note with weaker bases you may need more plates, with stronger bases you might
be able to slide by with less plates.
Mark your drill locations with a pen to be evenly spaced around the mold.
Watch out for cross beams underneath your surface where you can't drill. Make
sure you can reach your hand underneath your base to insert a 3 inch pin from
the bottom after you drill. Put a plate over the marked location and make sure
plywood is underneath the entire plate (do not let it overhang the plywood). DO
NOT MOVE THE MOLD OFF OF THE BASE OR EVEN TURN IT YET. (You have to mark the
position on the base with paint in a later step before it can be moved.) Now
drill with a 1/4" inch bit midway in the oval shaped base plate hole to
allow for minor adjustment later. After you finish all the holes from the
top, turn your base over and use the 1/4" hole to countersink about
1/4" deep the same size as the washer that fits the 3" pin (1").
Next, turn the base back over and redrill the 1/4" inch hole with a
5/8" drill bit. Do not work the bit around a little bit to make the
pins easy to insert, you want a snug fit. (Note: for single sheet bases, you
can just drill the 5/8" hole directly in the middle of the ovals in the
plates...make sure the plates are flush against the mold overlapping the entire
mold seam and don't wallow out your 5/8" hole so the pins fit tight.)
NOTE: If you don't need to share the pins with additional bases, we have
found it is easiest to secure the pins permanently to the base....use some
plumbers strapping on the bottom of the base or wooden patches to lock the pin
into the base. Make sure it is strong enough so that if someone happens
to step on a pin sticking through the base it does not fall down into the base.
Next, secure your mold to the base by putting a hold down plate on each 3
inch pin that you insert from the bottom of the base so that it is sticking up
from your base. Depending on the thickness of your bottom (i.e. if you used 1/2
inch plywood), you may need to make some "square washer spacers."
Just take some leftover plywood and cut it in into 3 inch square pieces. Then drill
a 5/8 inch hole in the center. Slip the spacer over the 5 inch pin before you
put it up through your base and the plate slot for the plate wedge will line up
above the plate so you can get a snug fitting plate. You can make minor
adjustments with the supplied washers. Always make sure there is at
least one washer on the bottom of each pin to keep it from pulling through the
plywood.
Put a wedge without a washer in the pin and tap it in tight. You may
need to stand on the bottom flange in order to get the wedge in. (The bottom
flanges are designed with spring built in too for a good seal.) Keep the wedge
facing sideways so you can undo it with a hammer when you take the mold apart
after casting. Your mold and base are now "fitted," and the last step
is to mark the position the molds should be placed on the base for future uses.
Just take a can of spray paint, and mark a line from the base to the mold panel
(don't be afraid to paint the mold, it's just a concrete mold that will look
like a gray concrete stain soon enough anyway...If your press coordinator wants
a pretty picture, you better let them take it now). We like to use a different
color for each side for easy mold set up. (We never did like looking for those
stenciled "A" and "B" markings anyway.) Just use what works
best for you to know where to place your mold on your base.
IMPORTANT TIP:
The paint markings will fade over time with concrete use. They need to
be redone on a regular basis. It is important to mark the molds in
a way that the concrete cannot fade them so that molds can be repositioned
accurately for future painting. So, take a 1/4" drill and
drill a hole in the bottom flange on panel one with a hole in your base right
beside this, got to panel #2 and drill two holes in the flange and the base and
so on....now your molds are marked in a way that concrete will not affect
them. You can do the same thing for A A , B B, and C C to make putting
the molds together after a long time easy.
Now, you may optionally trim your base along the trim lines shown in the
base construction graphics. Make sure the hold down plates are in place when
you do this step to avoid trimming too closely. This step does three things.
First, it lightens the weight of your bases. This makes them easier to move
around if necessary. Second, trimming the plywood puts less stress on the edges
if people try to stand on the base while working with the molds. And third, you
don't hurt your ankles and legs by running into sharp pointed edges.
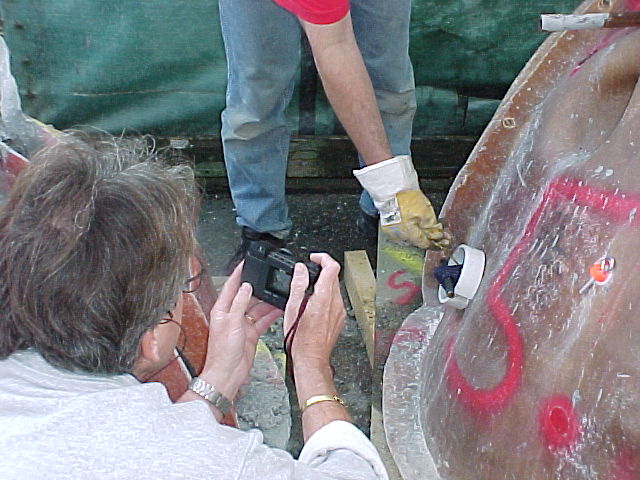
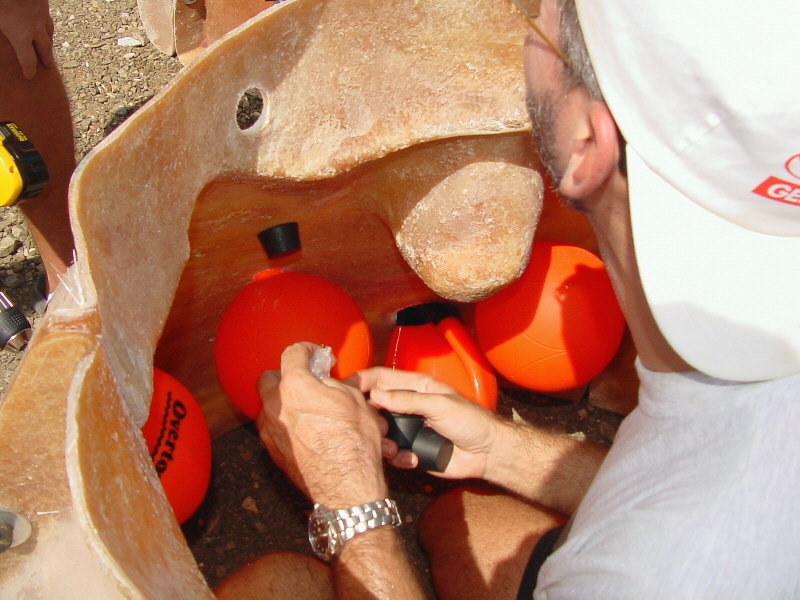
Reef Ball mold systems now come standard with attachment adapter plugs.

They are basically rubber stoppers screwed into your molds to make an
indentation for underwater attachment of corals, signs, markers, or other
objects that need to be added to your Reef Balls once they are
underwater. Even if you don't plan on using them underwater...do it
anyway because it costs you nothing and someone might want to add something to
your Reef Balls in the future. You can put them in different places on
every mold, but avoid placing them at an angle to demolding which will cause
them to fall off when you demold. If one falls off during the first
demolding, move its location. They are designed to pull free from the
screw if too much pressure from the demolding process is exerted.
To attach them to your mold you must first prepare the rubber stopper by
drilling a 1/4" hole into the center of the rubber stopper. Next,
break of the self taping tip of the placed dry wall screws and screw the
drywall screw into the rubber stopper. Finally, drill a 3/8" hole in
your mold where you want the rubber stopper to be placed then use the included screws
to screw from the outside of the mold into the drywall adapter in the rubber
stopper.
Now mix up a solution of 1 cup sugar with a quart of warm or hot water. Put
it in a spray bottle capable of making a fine mist. (We suggest a tight fitting
cap to keep ants away.) Mist the inside of your mold but there is no need to
mist the the side balls or center bladder. Make sure you get 100%
coverage on all the inside fiberglass. This is easiest when the molds are
apart.
[A garden style sprayer or air powered paint sprayer works
fastest....another tip is to bend the end of the garden sprayer into a U shape
so that you don't miss the underside of the fiberglass below the side balls and
built in "Chickens"]
A nice, even, coat everywhere will keep your new Reef Ball from
sticking to the mold and will give your Reef Ball a nice looking surface. Try
to put the sugar water on in time to let it dry. You may need to add sugar
again if it rains hard before you cast.
.
Next, put several shovels full of sand in the bottom of the mold.
1st, push a little sand around the edge of the mold where the plywood base
meets the mold to help seal it from liquid concrete leaking.
2nd, make irregular mounds, often connected to the side wall for habitat for
lobster, starfish, crabs and other ledge and bottom dwellers....you can do more
and more in larger and larger sized molds. In Reefs and larger, the patterns
should be quite extensive.
3rd Make sure there are at least 3-4 places near the edge of the mold where
you can still see plywood. This makes sure your modules come out at full
height. Visualize these low spots as "legs" for your reef ball and
make sure they will allow the unit to site evenly on the ocean floor.
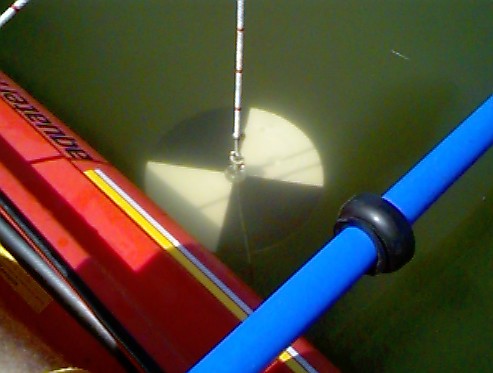
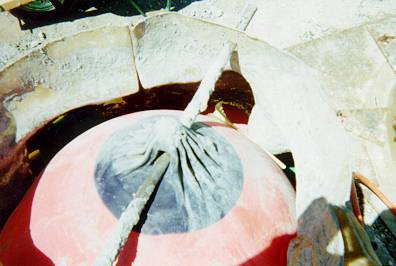
The Super Ball used a Polyform A-7 the Ultra and Reef Ball uses a Polyform
A-6; the Pallet Ball uses an A-5; the Bay Ball uses an A-4, the Mini-Bay
Ball uses an A-3, the Lo Pro Ball uses and A-2 and the Oyster Ball uses an
A-0). Look just below the neck of the bladder to find this number. Make sure
you are using the right size bladder for the mold. 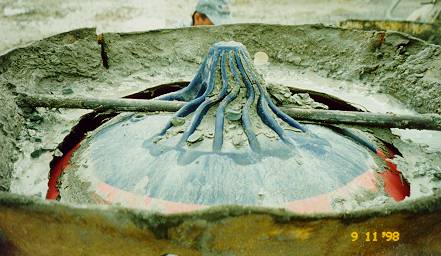
(Hold down bar)
Put the hold down bar through the hole in the top of the center bladder (a
short bar for the Bay Ball or a long bar for the Reef and Pallet Ball). Make
sure the bladder is deflated before you try to insert it. Put it into the mold,
from the top, and position the hold down bar through the hold down bar
holes. (After you have set your molds up for a while, you may find it
easier to put the center bladder in before you pin the last panel together.
This way you don't have to deflate the bladder all the way to insert it. If you
use this method, make sure you put the sand in the mold first before you insert
the bladder.)
Another tip, especially for the larger units is the lay the hold down bar
flat across the top of the mold but not in the holes when you first start
inflating it...when it is round, drop it down into the holes...this way, it is
easy to make sure the bladder is centered in your mold.
 Chickens are bricks,
smooth stones, or even poured concrete blocks that are placed in the top of the
mold to make the Reef Balls have whatever thickness you like in the top walls.
They take stress off of the hold down bar because the center bladder will have
a tremendous amount of upward force on it when it tries to "float" in
the liquidly concrete. THEY ARE REQUIRED FOR ALL POURS UNLESS YOUR MOLDS HAVE
BUILT IN CHICKENS, OR THE BLADDER WILL RISE SO MUCH THAT YOU WILL NOT BE ABLE
TO GET ANY MORE CONCRETE INTO THE MOLD. IT IS ALSO LIKELY THAT YOU WILL BREAK
THE HOLD DOWN BAR AND INCUR POSSIBLE INJURY--DON'T
FORGET YOUR CHICKENS!
Chickens are bricks,
smooth stones, or even poured concrete blocks that are placed in the top of the
mold to make the Reef Balls have whatever thickness you like in the top walls.
They take stress off of the hold down bar because the center bladder will have
a tremendous amount of upward force on it when it tries to "float" in
the liquidly concrete. THEY ARE REQUIRED FOR ALL POURS UNLESS YOUR MOLDS HAVE
BUILT IN CHICKENS, OR THE BLADDER WILL RISE SO MUCH THAT YOU WILL NOT BE ABLE
TO GET ANY MORE CONCRETE INTO THE MOLD. IT IS ALSO LIKELY THAT YOU WILL BREAK
THE HOLD DOWN BAR AND INCUR POSSIBLE INJURY--DON'T
FORGET YOUR CHICKENS!
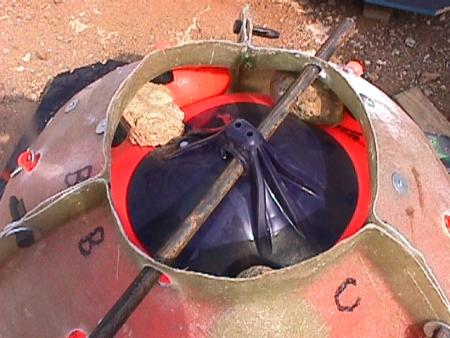
Note: Most new Reef Balls (Except the Bay
Ball) have "built in" chickens, if your molds have knobs at the top
of each mold piece, then you don't need chickens, however you can still add
them if you want an even thicker top wall. Below is a mold with a built in
chicken (see the knob?)
You need:
|
Super/Ultra/Reef Ball
|
Pallet Ball
|
Bay Ball & smaller sizes
|
|
Usually not needed.
4 Chickens
|
Usually not needed.
3 Chickens
|
2-3 Chickens
|
WARNING: NEVER INSERT YOUR HAND BELOW THE TOP LEVEL OF THE CHICKENS WHEN LIQUID
CONCRETE IS IN THE MOLD. IF THE CHICKENS WERE TO BREAK, THE FORCE OF THE
INTERNAL BLADDER COMING UP COULD TRAP YOUR HAND AND PIN IT TO THE MOLD.
Our authorized contractors have also had success using 3/4" pvc pipes
in the smaller sized units as removable chickens...ask your trainer about this
option if you want to use it.
TOYS.....TOYS....TOYS
Now is the time to play. Get out your texture balls or whatever else you are
going to use to make interesting holes. Here is a list of some things we have
tried, just remember to use non-toxic stuff and to keep a list of what you put
in each mold so that you don't forget to find the items. Note: This is
necessary for any latex product because turtles try to eat things like balloons
(They think balloons are jelly fish) and it can kill them!
Texture balls, Boat fenders, Inflatable pet toys, Peppermint sticks or
candies (Go easy, they make a bigger hole than their size), Dog food, Sand
inside a brown paper bag (Great for lobster holes at the bottom of the mold),
Blow up snake toy (Great for Moray Eel holes), Rubber door mats on the mold
walls (Makes neat looking textures--like brain coral), Basketballs, footballs,
beach balls etc. Balloons (Only helium grade and then only in the top--too deep
and they will collapse), Surgeon's gloves (blown up and tied off, also only
near the top), Wooden board (pinned between two side balls then removed with a
hammer) makes a great plaque holder. Use your own creativity!
Here are some specific ideas for biology:
Octopus Dens: Make a 1" hole in your mold about 6 inches from the
base. Get a wooden "dowel" (Often found at boat shops to plug
leaks or make your own) and plug up your hole leaving wood sticking inside your
mold. Get a GLASS soda bottle and fill it with water and then stick it
onto your Dowel...make sure the mouth of the bottle is very close to the mold
surface. Also, make sure it is in a location where the bottle will be
fully covered in concrete (not touching a side ball). When you demold,
take out the dowel before removing the sides. This will make a perfect
hole for a female octopus to lay her eggs. You will know you are
successful if when you dive your reef you see crab shells and other shells in
front of the hole from where she has been eating.
Lobster Holes: Use sand in the bottom of your mold making mounds that touch
the mold side and go back about 6 inches then turn to the right or left for
another 6 inches...this makes caves in your reef ball that lobsters love.
Thick/solid Bases: Put a brick (6-8 inches thick) in the center of the
bottom of your mold...this will keep the center bladder from going all the way
down. This makes a solid bottom (good for areas where settlement is an
issue) and then you can amplify your sand in bottom work to get even more
complex bottom shapes.
NOTE: Be careful when placing too many extra holes in your
Reef Balls for what we call "SHEAR LINES." If you make a continuous line
of holes around the mold, then the top will simply fall off when you open your
mold. In our early days, before the side balls were attached to the molds, this
was our worst nightmare. Now, you just have to think about the placement of
your extra "toys." Also, avoid placing "toys" in the
"structure arms" of the Pallet Ball and the newest Reef Ball molds.
"Structure arms" are the humps near the top of the mold that are
intended to give the Pallet and Reef Balls extra resistance to anchor strikes
and barge style abuses.
First, do a visual check to make sure all side balls are attached, inflated
and sealed; that sand is in the bottom of your mold; that all hold down plates
are secured and side flange pins are tight. Did you remember your surface
retarder (sugar water)? Did you remember your chickens? Is the hold down bar in
place? Okay, before you put air in the bladder, turn it so the inflation hole
is not directly under the hold down bar. (This is important for both the Pallet
and Reef Ball bladders since the hole would naturally line up with the
bar--just twist the bladder a few inches to one side BEFORE you put air in the
bladder.) As the bladder is inflated, you can move the side balls around a bit
to get just the hole pattern you are looking for. Sometimes you can pull two
side balls together to make an interconnecting hole that fish love. You can
even pull three close side balls together for one large hole (great for large
fish). As you inflate the center bladder, put in your "toys" so they
stay pinned between the center bladder and the walls of the mold. Just before
the center bladder is full, slide in your chickens. If you are working alone,
some people
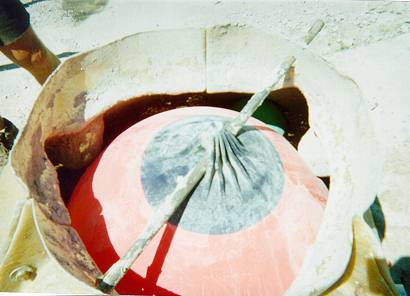
(This center bladder is UNDERINFLATED)
put a tie wrap around the chickens and secure them to the top pin in the
molds (this must be done as you pin the mold together). Alternately, just rest
your chickens on top of a side ball. Make sure your chickens do not stick out
above the hole in the top of the mold or removing the center bladder could be
difficult. As soon as your chickens are pinned to the walls, but can still be
wiggled just a bit, then your bladder is full. For the Bay Ball, your chickens
should be about as thick as a standard brick on its thin side (About 2 inches).
For the Pallet Ball, your chickens should be about as thick as a standard brick
on its thick side. (About 3 1/2 inches.) For the Reef Ball, your chickens
should be about as thick as two standard bricks on their thin side (About 4
inches). In general, use a thicker chicken when the concrete is less than
recommended strength, and thinner chickens when you are using stronger than
specified concrete. (If you are using large aggregate sizes, then stick with
thicker chickens.)
Before you order the concrete truck, you should arrange the molds on the
staging area so that it is easy for the trucks to come in and pour. Line all of
the molds that you have up in one or two rows from the largest to the smallest.
(This way the truck can just ease forward after finishing a mold, and if you
run out of concrete it won't be as likely to be an incomplete pour with the
smallest molds last.) Don't forget to turn your molds so that a forklift can
pick them up easily if needed. It's also helpful to locate the molds near a
source of water and electricity...bathrooms are nice too. Make sure the
concrete truck driver is on the same side as the molds being poured for maximum
efficiency.
When you order your concrete, you must not only give them a specification
sheet (attached as Appendix C or call W.R. Grace), but you must tell them how
much concrete you want. Here's the rule of thumb for standard sized modules:
For each Bay Ball add 1/8 th of a yard of concrete. For each Pallet Ball add .4
of a yard of concrete. For each Reef Ball add 8/10ths of a yard of concrete for
Ultras add .9 for Supers add 1.4. If it's your first time, you might error on
the high side. Remember, you can influence the amount of concrete your molds
require, so your actual usage may be up to 30% less or up to 50% more.
Metric Hint: Go to www.artificialreefs.org
under technical specifications to get the measurements in Metric.
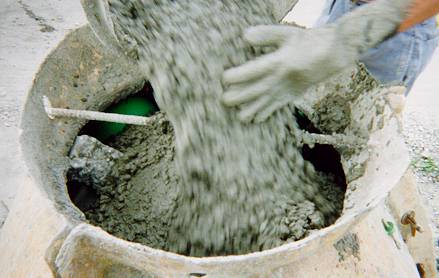
Before you pour, make sure you are wearing safety glasses, rubber gloves,
old clothes and a hard hat; have a rubber mallet or two handy, and have a
plastic trowel available to direct the concrete flow. The first step is to talk
with the driver of the concrete truck to work out a set of hand signals about
when to start the flow of concrete, when to stop the flow, when to move to the
next mold and what signal to use for raising and lowering the concrete trough.
Just a few minutes of conversation, especially with a new driver, can save a
big mess. Make sure the concrete mix has a 7-9 inch slump (for smaller molds)
and 5-7 inches for Super or Ultra Molds...do this. by having the driver put the
first bit of concrete in a bucket rather than the mold. If the concrete does
not flow quickly and easily to your satisfaction, have the driver add more
Superplastisizer (Adva Flow). Never let a truck come for delivery of concrete
without extra Superplastisizer (Adva Flow) on hand or keep some on site for
yourself. (If you put thick concrete in the top of your mold without checking,
it may clog the mold and make it impossible to continue the pour.) Now, have
the trough positioned about 2 inches above the knob sticking out from the
center bladder. (Never allow the trough to touch the mold, or to be so high
above the mold that you get splashed in the face with wet concrete. Remember
that the trough will sink about an inch and a half by the weight of the
concrete when the pouring begins). Aim at the knob so that you can use the
plastic trowel to direct the concrete flow around all sides of the bladder.
Signal your driver to begin the flow...slow at first...then faster as you see
the concrete flowing well. Don't let all the concrete flow to one side or the
center bladder will shift and you will have uneven sides. Just before the mold
is full, stop the flow and gently tap on the hold down bar with your rubber
mallet (DO NOT BEAT ON THE MOLDS WITH ANYTHING OTHER THAN A RUBBER MALLET, OR
YOU MAY DAMAGE THE MOLD) to help the concrete settle. If you see or hear voids
in the mold (a hollow sound when tapped with the mallet), just tap on the mold
at that point. You don't need to "over tap" the concrete because the
irregularity of concrete that is not fully tapped into the mold makes very
interesting textures and holes that are excellent for reef life. With
experience you will get the concrete mix just right and not even need to tap
the mold at all...this is actually ideal for the molds and the biology of Reef
Balls and should be your goal.
After tapping, add a little more concrete (up to the level
of your chickens or about 6 inches below the hold down bar), and then move to
the next mold. After all of the pours are complete, go back and re-tap the
molds to make sure that the concrete leaves a large hole around the top part of
the bladder.
(This mold is filled up correctly, but
make sure you can still get to the deflation valve on the center bladder)
This makes removal of the bladder easy. If excess concrete covers the
bladder, remove it or push it up the walls to create a little extra height in
the modules. Make sure the inflation hole is clear so it is easy to get to once
the concrete hardens. This is a good time to check the screw cap in the center bladder
to make sure that air is not leaking from the inflation valve now that pressure
is on the bladder. A little bit of dish washing detergent and water on the
valve will show any leaks as bubbles. Now, get out the garden hose and rinse
the concrete that spilled out of the mold. This is much easier than cleaning
off hardened concrete the next day--trust us. NOTE: Most concrete trucks carry
a hose and water on board, and, if you are nice, they will usually let you use
it.
When pouring, you may hear a few "popping" sounds. This is normal,
especially with new molds. Inspect your molds often, and if you suspect weak
spots are developing in older molds, then just hand lay up a fiberglass patch
to the outside of the molds.
Do you still have concrete left over? If so, you can deflate a center
bladder a bit and add more concrete to make heavier modules if you are using a
barge deployment style. You can also make small forms for your chickens and
make chickens for your next casting. (We make our chickens with a piece of
string hanging out so that we can tie our chickens to the top pin when we put
our molds together. This way it does not take two hands to inflate the bladder
and hold the chickens in place.) It's always a good idea to have the driver
pour a bucket or two of leftover concrete for you in case you find a void in
the mold that needs filling after the truck has left.
Another idea is to create "Reef Forms"...just make molds in your
sand pile to make small reef features that can be added to the inside of your
Reef Balls for added complexity.
Curing time varies greatly depending on the concrete mix, wall thickness,
outside temperatures and use of accelerators. Ask your concrete supplier for
recommended hardening times. In general, about 7-12 hours is required when no
accelerators are used and temperatures are at least 70 degree Fahrenheit. With
accelerators and warm days, as little as 3-4 hours is possible (we say
possible, but it takes some skill). In cold climates, 24 or more hours may be
required. If you are using accelerators, or if the weather is very hot (over 90
degrees or your molds are in direct sunlight), then we recommend letting a two
second burst of air out of the center bladder at about 2-6 hours after the
pour. (When the concrete reaction begins and the molds begin to generate excess
heat.) This is because the center bladders get hot and the air in the bladders
tries to expand. This can cause cracks in the concrete near the mold
seams--especially with high microsilica mixes.
If you attempt to open the molds with minimal setting times, you may wish to
take the pins off the side balls to accomplish a more gentle demolding.
This costs set up time but can allow earlier demolding) In general, the
earlier you can demold without breaking your balls, the easier it is to demold
and the longer your molds will last.
Look at the concrete at the top of the mold. Is it hard, and not crumbly
when you break off a piece and squeeze it? Feel the mold. If it is still very
hot, it's probably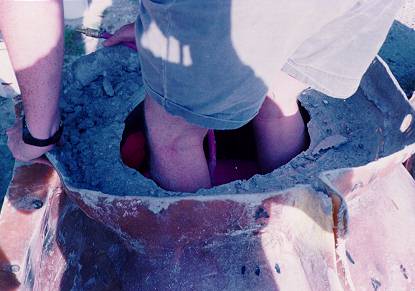 too soon. If everything looks good, then the first
step is to deflate the center bladder. Deflate it so that
there is no pressure on the side walls or side balls, or you may break your
reef ball when opening it. We use a wet/dry shop vacuum with the vacuum hole
closed off and standard pneumatic air lines fitted in its place to make
deflation of the center bladders fast in commercial production. (Reef
Ball Tool Kits come with Stinger Vacuums) You can also deflate by hand or even
by standing on the bladder. (However, once you gain a little experience,
you can leave just a little bit of pressure on the side
too soon. If everything looks good, then the first
step is to deflate the center bladder. Deflate it so that
there is no pressure on the side walls or side balls, or you may break your
reef ball when opening it. We use a wet/dry shop vacuum with the vacuum hole
closed off and standard pneumatic air lines fitted in its place to make
deflation of the center bladders fast in commercial production. (Reef
Ball Tool Kits come with Stinger Vacuums) You can also deflate by hand or even
by standing on the bladder. (However, once you gain a little experience,
you can leave just a little bit of pressure on the side  walls so the molds will
pop open themselves when the side pins are removed. But don't try this until
you have made at least five good castings.) Look inside at the concrete...still
look firm? Good. (Don't be fooled by the sugar's effect on the surface which
may still appear like uncured cement.)
walls so the molds will
pop open themselves when the side pins are removed. But don't try this until
you have made at least five good castings.) Look inside at the concrete...still
look firm? Good. (Don't be fooled by the sugar's effect on the surface which
may still appear like uncured cement.)
Next, remove the hold down plates by tapping out the wedges. (It's
good practice to put them in a plastic bucket as soon as you remove them.
Regardless, about every 10th use, apply a coat of WD-40 or other protective
lubricant to reduce rusting and corrosion.) Next, remove the pins from all of
the tether balls (after you have had experience, it is normal to leave tethers
pinned because they flatten out so much that they pop out of the concrete with
ease) and remove the screw caps from the Polyform side balls.
Insert a blunt pin in the hole to let the air out.
If you forget this step, then the mold panels will not come
free from your module. Now remove the side pins, washers and wedges and put them
in your plastic bucket for WD-40 treatment. Work around the mold in the same
direction and remove the panels as you go. To remove the panel, gently pull on
the mold. If it does not easily break free, use a plastic wedge or screwdriver
and tap it with the rubber mallet between the mold seams (side flanges). Slowly
pull away the panel, making sure to feed the tether ball pins through their
respective holes. You may have to stick your hand around the mold to free up
stubborn Polyform side balls, especially ones that did not have too much air in
them. The key is to be gentle so that you don't damage the side balls or the
green concrete. Once all of the panels are removed, you may begin to remove the
remaining tethers from the concrete module. Put the pin back into the knob and
pull on the pin rather than the knob to remove the tether. Tapping on the edges
of the holes with a rubber mallet will help open up the holes for stubborn
tethers.
If you demold early enough, this won't be an issue and all the side balls
will stay attached to the mold for quick re-setting times.
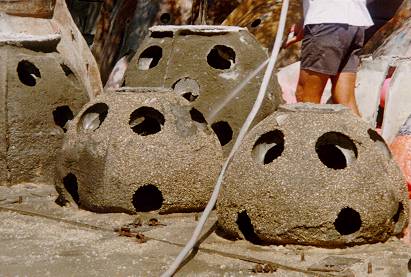
(Above foreground shows proper texture
after sugar water is applyed and the ball is rinsed directly after
demolding. Background shows balls just about to be rinsed)
Now, take a garden hose and rinse the module down with water. As you rinse,
the sugar water allows the top layer of concrete to be removed, exposing the
underlying rocks in the concrete. Be creative and sign your name if you
like--(after all, you are the one saving the ocean). Any surface that you don't
rinse will be hard in about a week, so you can experiment with stamping or
shaping the surface any way you like. Don't forget to remove any
"toys" you placed in your mold. A hammer will help you get hard to
retrieve "toys" out of the concrete.
You should let the module continue to harden as long as possible while still
on the base before removal to reduce the chance of breaking the modules.
(Concrete will continue to develop strength as long as the humidity is above
80%. So, it's a good idea to cover the module with plastic if it's not raining
outside. Alternately, you can wet the module down with water every few hours to
get quick strength.) Many of our customers build two bases for every mold--that
way you can go ahead and set your mold up on the next base as you de-mold the
first modules. This gives the modules an extra cycle before they are moved off
of the base. Extra bases are a necessity if you are using accelerated mixes and
expect a 3-4 hour turnover rate. They are also required in colder environments
for rapid turnover.
For Reef Balls, we recommend at least a 4 inch wide sling and a large
forklift or back loader to pick the Reef Ball up from above.
(Not the easiest way, but a useful
techique if your lifting straps are too short to make a double loop).
Whatever you use, make sure the equipment can handle6000+ plus for the
Super Ball, 5000 lbs+ for the Ultra Ball, 4,000+ pounds for the Reef
Ball, 2,500+ pounds for the Pallet Ball and 600+ pounds for the Bay Ball. NOTE:
A sling is almost three times as strong if it is attached at two points (both
forks) rather than just a single point. Always use the bottom most holes for
the sling (on any sized module). For Pallet Balls, a standard forklift can get
under the module, or four people can even lift up the bottom, turn the unit on
its side and roll it across the field. Three or four people can lift a Bay Ball
and move it around too. It's easiest to lift up the base until the Bay Ball slides
off before you move it. This way you are not fighting the concrete that sticks
to your base. Whatever you do, never get underneath a module being moved AT ANY
TIME.
Never pick up a module by the holes in the top of the unit or breakage
and possible falling concrete hazards will occur!
Store your modules where they will be exposed to at least 80% humidity. A
plastic tarp, sprinkler system or pond is excellent during storage. Black
plastic in the sun can create a "forced cure" environment and can
greatly reduce the curing time needed before deployment...this is highly
recommended. At least leave them in the weather for the occasional rain.
Avoid direct sunlight that can dry them out and stop the curing process unless
you have plastic around them. You can cure them in saltwater too, but try
to to cure them were barnacles and other high pH resistant animals can not
colonize and keep future coral off the Reef Ball.
Most of our clients undertake some form of monitoring program to assess the
success of their reefs. This is the main reason to add identification numbers
to your modules. Other clients like to add things like their name, a company
logo, or even a dedication to a loved one. Many techniques are available to
mark your Reef Balls, but here are a few very simple ways that work:
--Purchase a concrete stamping engraver set. Just pick out the letters and
punch in your message with a hammer. A light coat of anti-fouling paint will
help keep marine life a bay so you can read your message. We have arranged a
special deal on engraver sets for our clients through Ziegler Tools Inc. Just
call and ask for Jerry Shackelford and he'll help you. The most often ordered
sets are as follows:
3/8 Numbers Set, #08091 for $19.13 3/8 Alpha Set, #08271 for $57.38 1/2
Numbers Set, #09091 for $28.38 1/2 Alpha Set, # 09271 for $85.17
These prices reflect a 25% discount that Ziegler Tools Inc. is offering to
Reef Ball customers. The contact information is as follows:
Ziegler Tools Inc. ATTN: Jerry Shackelford 711 Marietta Street, NW Atlanta,
GA 30381 U.S.A.
From Georgia call (800) 282-5111 From Zone 1 call (800) 241-4555 or call
(404) 892-7117
-- Have a plaque made up
and attach it before deployment. A concrete drill bit will make suitable
mounting holes. Be sure to use stainless steel bolts. (Brass plaques don't need
anti-fouling paint.)
Have a plaque made up
and attach it before deployment. A concrete drill bit will make suitable
mounting holes. Be sure to use stainless steel bolts. (Brass plaques don't need
anti-fouling paint.)
--Engrave (use your stamper) the hollow PVC pipe used as a chicken to make
the module show up on sonar. (Use anti-fouling paint.)
--Spell a message with your fingers (wear a glove) in the top part of the
mold while the cement is wet (it won't last long, but if you are lucky your
message will appear with a different assemblage of marine life than the
surrounding cement). A sharper message can be made about 4 hours after pouring
by using a screwdriver to scratch in your message.
--Use a rubber mold in the Reef Ball mold to put a logo (like in the
picture below) or other large message on every module that you produce.
Rubber molds are available from Increte Systems at (800)-752-4626. Ask for Mike
Richey. They charge about $150-$200 for the first "master" and $10-15
for each rubber plate afterwards. These folks can also make complete mold
inserts with any texture or logo you desire, but they may cost a few thousand
dollars for the master. You can also make them yourself by carving the image in
a block of wax (you can get at any hobby store) then pour 2 part urethane
rubber into the wax mold to make your insert. Attach this to the inside
of your mold and it will come out like the picture below.
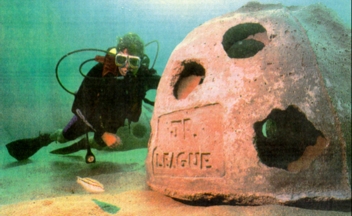
--Add markers via the Attachment Adapter System
Whatever you try, it is helpful to scientists if you include the date of casting,
the date of deployment, special material composition (microsilica for example),
and a contact name and number. ID numbers and an associated log of all the
facts you can gather are also extremely beneficial. Remember, even if you never
plan to study your reef, others might. After all, Reef Balls are the first
standard design for artificial reefs being built world-wide on a large scale
basis, and they will be around for centuries for future scientists to study.
We also recommend that you take a standard concrete cylinder with each
concrete pour so you can check quality control later if you have any breakage
or problems. Contact your local cement company for procedures used to
document and test concrete.
Layer Cake Reef Balls And Other Styles
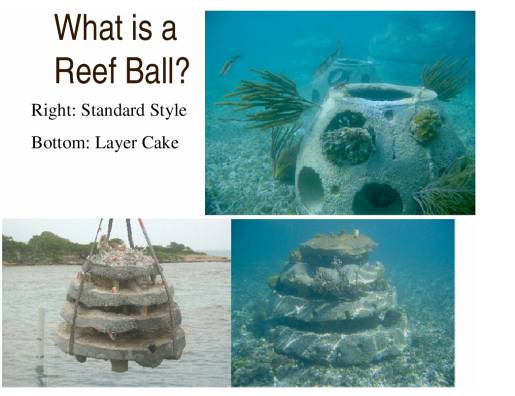
You can use your molds to make a large variety of Reef Ball styles. The most popular style is our Standard style
like you learned how to make in this manual.
The second most popular style is Layer Cakes as seen above. There are also styles called Stalactites,
Stalagmites, Hybrids, Sea Grass (requires an additional base component),
Lobster Ball, Conch Ball, Predator excluded, and many others. Most of these are
a variation of the Layer Cake style of casting.
Layer Cake castings involves putting alternate layers of sand, rock and
concrete into your mold. Unfortunately, learning to build these advanced styles
is more of an art, than a science and there is really no way to teach the
technique in a manual. It’s definitely
the poster child for “hands on learning.”
Therefore, ask your trainer to teach you how to create these other
styles if you are interested in using them.
Do not all of the non-standard style Reef Balls can’t be floated like a
standard style reef ball. They are also
not as stable as Reef Balls and should not be used in shallow water without
anchors. They are heavier than standard
Reef Balls so they will take more concrete and may require stronger lifting
equipment.
There are many ways to deploy our modules. Some use floating deployments;
some use a barge with the center bladders in place; some just throw modules
over the side and let them land where they may.
Barge Deployments
We have learned that the ending position has much to do with the starting
position for barge deployments .
.
(Correct water entry for free falling deployment)
For the maximum percentage to land "bottom down" use a “Wagner” or "Pelican Release Hook"
and lower the unit slightly into the water before releasing. or for 100%
upright lower all the way to the bottom
before releasing or if you add a fully inflated center bladder you get 100%
bottom down each time.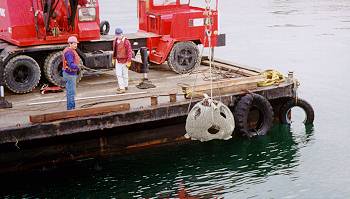
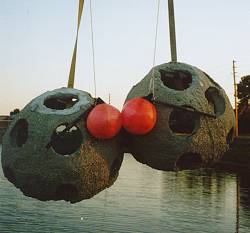
Look closely at the above photo and you will see one method to lower balls all
the way to the seafloor and then to have them release. Release is
accomplished by pulling on the smaller rope which is attached to the pull rod
and buoy. The buoy is to float the pull rod back to the surface.
The main lifting strap has a loop in the end into which the pull rod is
inserted...gravity and pressure holds it in place. When on the bottom,
gravity and pressure is removed so it is easy to pull the rod out of the loop
and thus both lines are returned to the surface. A Wanger automatically released the Reef Balls when the Reef Ball
touchs the bottom and was specifically designed for Reef Balls. Wangers can be purchased from Sea Search of
Virginia.
Josh Looney
3515 Huette Drive
Norfolk, Virginia 23518
www.seasearchofva.com
Bus: 757 480-1980
Fax 757-480-9671
Cell (Josh) 757 871-9760
Home 757 480-0005
Little Creek Marina 757 362 3600
How you deploy from a barge will largely depend on what type of equipment is
on the barge.
Cranes: Best to lower the units to the bottom if you have enough
cable. Spreader bars can allow for multiple units to be deployed in
specific patterns. Common patterns are linear and star.
Front end Loaders: Best to use a Pelican Hook setup and lower the units over
the side of the barge until the bottom of the Reef Ball is just touching the
water then do the quick release with the Pelican.
No Equipment: Come-a-longs or round PVC pipes/pilings as rollers can be used
to offload. You will typically get a higher percentage of balls the don't
land upright with this method unless you leave a partially inflated center
bladder in each unit to be retrieved by divers later. You can also
upright balls on their side with divers using lift bags.
Winches: Same as Front End Loaders.
Call us with specifics about your deployment and we can offer suggestions
based on our experiences with whatever equipment you have available.
Floating deployments require modules with higher strengths to make sure
modules do not break during transportation and end up in the wrong place. The
units must also be made with thin walls if you want them to float easily. At
their standard weights, the modules should just barely float. If your units are
over the standard weights, an additional buoy or two tied to the bottom of the
unit for extra floatation will help. (This may be required in fresh water since
the specific gravity of fresh water does not provide as much lifting forces.)
Tow your units with heavy line to avoid line breaks. Keep the units in close to
the boat when maneuvering around the docks and out the channels until in open
waters. Always have a surface buoy marking the towed units so that passing
boats will not accidentally run into the modules. When you arrive in open
waters, tow them away from the boat to avoid propeller wash drag. You will save
gas by towing the units slowly (about 2 knots). They take exponentially more
power to go faster, and they take about the same amount of power if you are
towing one or ten. Don't attempt floating deployments when seas are above 2-3
feet, in poor visibility conditions or if a storm is brewing. You must tow them
further than the depth of the water, or use a quick release knot on the boat so
that if a bladder were to somehow deflate, the line would not break the cleat
on the boat. When using divers, deflate the bladder until the unit is almost
ready to sink over the intended site. Some clients like to anchor the floating
units first, then sink them to insure proper placement. Climb onto the unit to
make it go down a few feet and then the water pressure will continue to make
the bladder smaller so the unit will sink. DO NOT HANG ON TO A BALL WHILE IT IS
DESCENDING. The accelerating speed is not one that Scuba divers are used to,
and ear damage may occur. Wait until the unit is on the bottom before moving
it. DO NOT EVER GET BELOW A FLOATING UNIT. Once on the bottom, 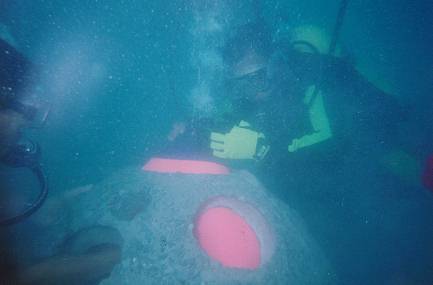 remove
your fins (and attach them to your BC--never part with your fins underwater),
and then pick up the ball and move it to the desired location. Another way to
move the unit is with standard lift bags. Once the units are in position,
continue deflating the center bladder. Push, using feet or arms on the bladder
from the side as it deflates to make sure the bladder does not form a
"mushroom" shape. This shape makes removal difficult.
remove
your fins (and attach them to your BC--never part with your fins underwater),
and then pick up the ball and move it to the desired location. Another way to
move the unit is with standard lift bags. Once the units are in position,
continue deflating the center bladder. Push, using feet or arms on the bladder
from the side as it deflates to make sure the bladder does not form a
"mushroom" shape. This shape makes removal difficult.
Another way to deploy the unit without divers is to attach a second bladder
(of the same size as the internal bladder) to the top of the internal bladder.
Then simply remove the cap from the inflation hole of the internal bladder and
the unit will remain on the surface until the internal bladder is deflated and
removed by the force of the unit pulling down. The unit will descend to the
ocean floor without a bladder in it. Because the Reef Ball is already bottom
down, this method has a high percentage of perfectly landed modules.
For long hauls, or when it is desired to tow several units at once, we
recommend that you space the balls with 2 by 4 boards that are eight feet long
with a hole drilled about 4 inches from each end. Tie your towing ropes through
the 2 by 4's, but don't put the stress on the wood. You can still bring the
units in close for maneuvering by "folding" them with lines on your
furthermost units. Once at sea, let them out for faster towing. Covering each
ball with a tarp, or using a long tarp attached to the tow line with floats on
each side and a weight in the back will reduce drag to increase the maximum
towing speed. With these techniques it is possible to get up to a five knot
towing speed, but 3-4 is more efficient. Just as captaining a boat requires
thought, so do floating deployments...be careful and think!
DEPLOYMENT PATTERNS
A question often asked by our clients is how to space the balls on the ocean
floor. The answer is...IT DEPENDS. First, ask yourself, why are you building a
reef? Fishing? Scuba Diving? Environmental Enhancement? Breakwaters?
Lobstering? To Restore A Damaged Reef? Obviously, we recommend that the first
step is to look at the natural reefs in the area and to try to mimic them.
Mother nature often knows best. This is a long topic which scientists are just
beginning to study. Remember, however, the more varied the reef, the more
likely you will achieve our goal of species diversity.
One thing we have observed is that humans like to see things well organized
(i.e. patterns) whereas fish don't care. What seems to be important to
fish and marine life is the DENSITY of the deployment over a given area.
This can depend on what is near the site (i.e. other reefs, sand flats, estuary
systems, etc.). Dr. Bill Lindberg at the University of Florida has done some
good work on density in relation to Gag Grouper. He is a good resource
for fielding questions about density.
Another observation we have is that clusters tend to offer additional
habitat for fish in that they use the area between the reef balls just like the
inside of the Reef Balls.
So, our best recommendation is to determine what density is appropriate for
your area then to randomly deploy clusters of Reef Balls until that density is
met. Clusters range from 3-100 units typically. Even here, we
suggest random cluster sizes.
NOTE: SEE APPENDIX F: FOR EVEN MORE
ANCHORING OPTIONS
There are several methods used to
anchor Reef Balls when they are used in high-energy areas in less than 20 feet
of water. First, note that you probably don't need anchors if you are
deploying deeper than 20-30 feet. And you may not need anchors in less
than 20 feet depending upon the bottom type (sand or soft bottoms are more
stable than hard bottom when it comes to movement) and wave climate.
Contact us for a recommendation to anchor or not to anchor and we will help you
make an intelligent choice.
If you choose to anchor your Reef
Balls, there are a variety of methods. Double helix screw anchors are
good choice for sand bottoms subsidence is not an issue. They can be
embedded in your Reef Balls before casting by covering the anchor head with a
paper bag full of sand and coating the shaft with sugar water letting the
anchor eye stick out of your mold seams (pre drilled) at about a 45 degree
angle. Call us for details.
Fiberglass rebar anchors inexpensive
and are often used on hard bottoms (short) or firm bottoms (longer)..
Fiberglass rebar anchors are particularly good at resisting shear forces but
not so good for uplifting forces. To use fiberglass rebar as an anchor, PVC
pipes are embedded into the Reef Balls and a pneumatic drill is used to drill
the bottom then the fiberglass rebar is then dropped into the hole (hard
bottom) or the rebar is hammered in (soft bottoms) once the Reef Balls
There
were a variety of anchoring methods used, and in many cases, combinations of
the methods are used. Before any new method is used it should be tested
in the field for anchoring ability.
Anchoring Cones
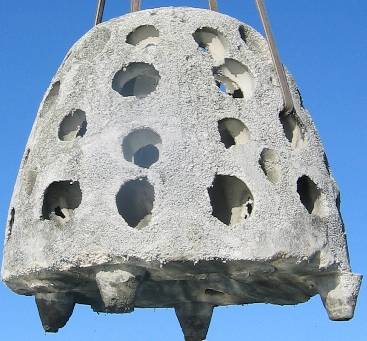
These
system is used when deploying in sand or soft to semi-firm bottoms and prevents
horizontal movement (or “walking) of Reef Balls in high wave
climates The four anchoring cones on the above Goliath Sized Reef
Ball were cast monolithically when the Reef Ball was made and are designed to
slowly settle over a period of months into the seabed. After
settlement, the cones will prevent lateral movement of the Reef Ball during
storms.
Anchoring With Rock 'Cones' for Layer
Cake Style Reef Balls
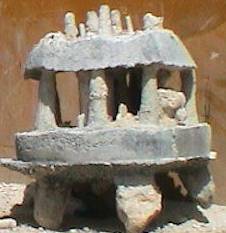
'Layer Cake' Reef Balls were cast
upside down, so instead of using anchoring cones, once can use selected natural
rocks about the size and shape of the anchoring cones. The concept is
similar, the units settle by themselves over time or they are assisted by jet
pump that provides additional stability from lateral movement and
overturning.
Anchoring Spikes
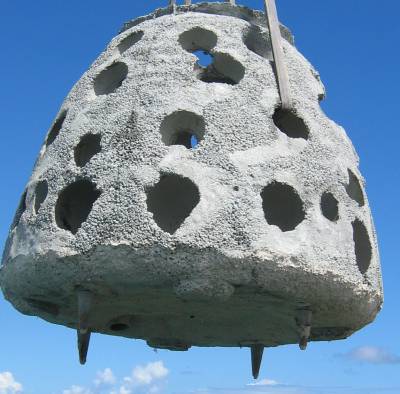
In
areas where the bottom was 'hard packed' (so hard that it was difficult for
rebar to be driven in by a sledge
hammer) pre-cast spikes with #5 fiberglass re-enforcement can be cast into the
Reef Ball bottoms. Engineering pressure tests indicated the size of the
spikes needed to be self penetrating by the weight of the units when
installed. These spikes provide resistance to lateral movement.
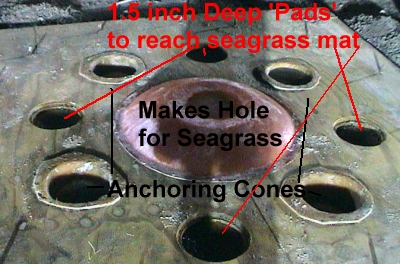
Above
is a picture is the base of a Reef Ball with specific adaptations for use in a
sea grass bed. This is an advanced
anchoring technique that takes into account keeping the sea grass below the
Reef Ball alive so call us if you plan on deploying over seagrass beds.
Battered Anchoring Pilings
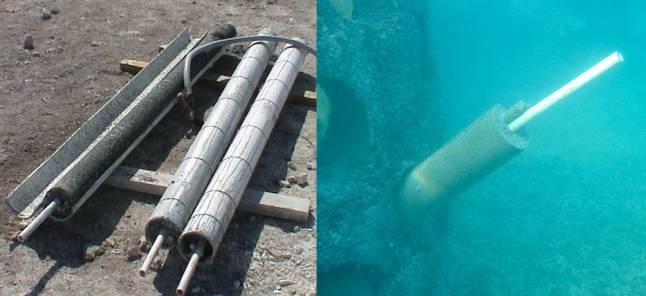
In
areas where the sand was 'soft' and
subsidence(sinking of Reef Balls into the seabed) is an issue battered pilings are used. Three or four piles
in a 'tripod' or square pattern are
jetted in until they reached the hard bottom below the soft sand. During
installation, the crews first jet to the bottom with a 4 inch pipe to determine
the exact depth. Next they would insert a pile of the appropriate length
and use the smaller 1/2 inch PVC pipe precast into the pile to jet it to the
bottom. Three pieces of #3 fiberglass rebar were added to each precast
piling for strength. Pilings can be made in lengths ranging from 3 feet to 8
feet. When there is no hard bottom
below, the same technique is used but the pilings are called “friction” piles
and the diameter of the pilings must be changed to match the friction
characteristics of the seafloor. This
requires engineering tests of the sea floor, contact us for details.
Anchoring With Battered Fiberglass
Rebar
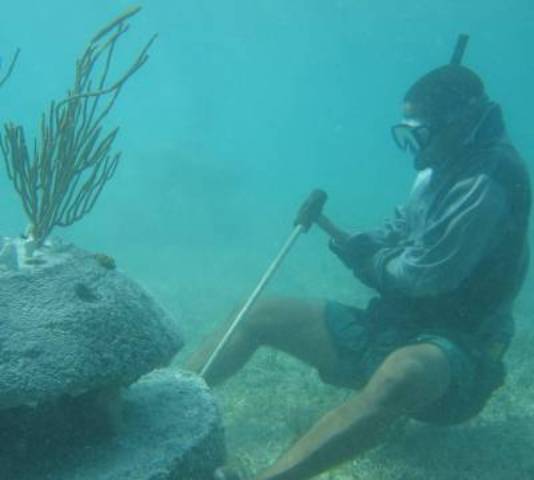
In
areas where there is very firm or hard bottom,
3-4 pieces of battered #5 fiberglass rebar can be drilled or driven into
the seabed. Holes for both the fiberglass rebar and the piling anchoring system
are cast into every Reef Ball made to provide multiple anchoring points.

Many clients ask us how to anchor their
Reef Balls. First, it should be understood that Reef Balls were designed so
that they would NOT require anchors. In most cases, the weight distribution and
hydrodynamics of the modules will keep them in place through even the worst
storms. Five reef ball reefs have been hit with heavy tropical storms that were
strong enough to rip a heavily anchored airplane into two pieces and to move 14
ton concrete blocks across the bottom. To date, there has never been a Reef
Ball, Pallet Ball or Bay Ball that has been reported to have moved. One of the
Reef Ball reefs hit by tropical storm Gordon was located in under ten feet of
water, and it 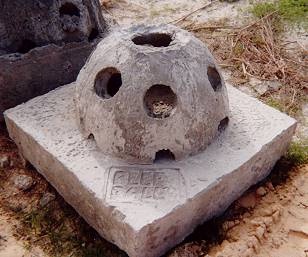
showed no movement. Reef Balls have
also been proven in breakwater applications. However, any object in the ocean
can move under extreme conditions. If you feel that your reef needs anchoring,
we have developed several techniques to make it easy. To make attachment
points, just use a 1/2 inch stainless steel I-bolt with a large washer attached
to the end, and place it between the side flanges about 6 inches above the bottom
of the mold. You may need to drill a hole right at the flange joints for large
bolts. Leave the circle in the I-bolt sticking out of the flange. You can add
as many of these attachment points as you need for anchors.
Now, you just need to select an anchor
and attach it to the I-bolt. We suggest the use of stainless steel airplane
cabling to connect the anchor to the I-bolt. House trailer tie down anchors are
inexpensive, but may only last 10-20 years. Double helix anchors are available
that have a much greater holding strength, but they also cost more.
Another trick is to wrap a house
trailer tie down anchor (just the bottom screw part) in a paper bag with sand
in it. Coat the shaft with several layers of sugar water, letting each layer
dry. Position the anchor in the mold just like the I-bolt at a 45 degree angle
leaving a foot or more sticking out of the flange. After casting, flush the
shaft with a garden hose to make sure it breaks free from the concrete. On the
ocean floor, just tap the shaft into the sand. Then screw it in tight.
Your molds should require very little maintenance. Once in a while, take
them to a car wash or use a pressure washer to blast the concrete off of them.
A good coat of car wax on the outside helps seal them from weather and keeps
concrete from sticking to the outside of the mold. If you keep the metal
parts well coated with oil, they should last for years. Once in a while, the
fiberglass panels will need a re-enforcement along a seam or at a bolt hole,
(especially if your molds are used often or are left in direct sunlight for
long periods of time). Just go to a fiberglass supplier to get some fiberglass
resin, roving or cloth, a paintbrush, rubber gloves and some acetone for clean
up. First, sand down the area to be patched. Always patch to the outside of the
mold (the inside will have too much concrete residue to let the fiberglass
stick). Then, add the activator to the resin as indicated on the container. Dip
the roving or cloth (cut it first to fit the area you are strengthening) in the
mixture and lay it over the area to be patched. Wear a good mask, latex gloves
and old clothes. Use the paintbrush to put the cloth in place with a dabbing
like action. Work the cloth or roving with the paintbrush until it is clear and
smooth. After it hardens, sand it down and re-drill any holes you covered up.
Any body shop can do the work for you if you don't like working in fiberglass
(and we don't blame you...we hate it too).
FOR HELP
Your mold systems come with support from us. Just call or fax us at any time
for a prompt response to your questions. IF possible, direct inquires to
our e-mail (reefball@reefball.com) Otherwise, our phone number is 941-720-7549
or fax 425-963-4119
BREAKWATER REEF BALLS
Reef Balls used to create submerged breakwaters require special casting
techniques.
1) Bottoms must be much thicker; 6-8 inch bricks must be placed in the
bottom of the molds to create an idea weight distribution to avoid over turning
in waves.
2) Holes must be made for potential anchoring, even if not planned. 2
holes per side panel are required. One should be 8 inches above the mold
seam and have PVC pipe with an inside diameter of at least 5/8" at a 70
degree angle ending at the mold base and protected from filling with concrete
by sand. The second should be
made with a 4” diameter PVC pipe, which must be removed two hours after casting
also at a 70 degree angle. This one
requires a specially drilled hole, ask your trainer for details.
For the smaller hole, The PVC can be removed after the concrete is firmed up
but not cured and reused if desired or it can be left in the mold and cut
flush.
4) Only Pallet, Reef, Ultra, Super Balls, Golieth or Combo Balls should be
used for breakwaters in open ocean wave climates.
5) Holes should be opened up as much as possible to allow for better flow
through.
Step 1: INSERT TETHER BALLS Insert the tether balls into each of the three
mold sections. Do this by first pushing the pin attached to the tethers through
the holes in the mold from the inside. Pull on the pin and the string will
bring the tether ball attachment hole to the outside of the mold. Then push the
pin through the attachment hole on the tether. Place the green tether balls on
the lower six holes and the yellow or orange tethers in the top six holes. (The
green tethers should not be pumped up with air as much as the yellow or orange
tethers so that they are easier to remove from the finished Bay Ball.)
Step 2: ASSEMBLE THE MOLD SHELLS Place 3 fiberglass shells together on top
of the plywood base. Make sure they are in the correct order. Place pins in the
side flange with the pinhead sticking out of the right side of the flange (the
side with built in washers). Place a washer on the left side of the flange then
insert the wedge. Put all the pins, washers and wedges in all the side
flanges--then use a hammer to tap them into place.
Step 3: FIX SHELL TO PLYWOOD BOTTOM Spin the pinned Bay Ball shell around on
the plywood bottom until it is lined up properly (the six holes in the bottom
should all be about 1/2 an inch from the bottom lip of the mold). Insert the
six remaining pins from the bottom (with the head of the pin underneath the
plywood bottom). Place a hold down plate (looks like a big square plate with a
hole in the middle) on top of the pins and overlap on the mold bottom flange.
Then insert the wedges into the pins and tap them into place with a hammer.
Optional Step: CREATING A LOBSTER HOME To make a lobster hole, take a paper
grocery bag and put about three quarts of sand in it. Roll it up like a
"cigar," and bend the "cigar" slightly. Place it in the
bottom of the mold with one end of the "cigar" touching the shell.
When the ball is finished, use a garden hose to remove the paper and sand.
Step 4: INFLATING THE CENTER BLADDER Place the deflated central bladder into
the center of the mold with the hold down bar secured by the two holes in the
top lip of the mold. Inflate the center bladder until it is just touching all
of the tether balls. Place three half bricks that is two or three inches thick
about six inches down from the top lip along each mold seam line. (We call
these spacers "chickens." That is a term used for items used to space
rebar away from concrete forms before the concrete is poured.) Hold the bricks
or stones (the chickens) in place while you continue inflating the center bladder
until the chickens are locked in by the bladder. Now you have just the right
amount of air in the center bladder to make the top of the Bay Ball be three
inches thick. (You can use chickens with different thicknesses to control the
thickness of the walls at the top of your Bay Balls.)
Optional Step: MAKING TEXTURE HOLES You can add "texture" balls to
the mold at the same time you put the chickens in the mold. Try to place them
where the bladder locks them into the side walls of the mold with the inflation
hole being pressed against the mold wall. This way they are easier to take out
of the finished Bay Ball by deflating them a little bit.
Step 5: QUALITY CHECK
-Use the hammer to tap in all the wedges one more time to make sure the are
tight -Look into the mold --Are the chickens locked in, but not so much that
you can't wiggle them a little? --If you can't wiggle them, let a little air
out of the central bladder. --Are there clear pathways for the concrete to flow
easily into the mold? ---If not, remove the texture balls that block the path.
--Are all twelve (count them) tether balls in the mold? ---OOPS...start over at
step 1. --Is the hold down bar sticking out evenly from both holes? --If not,
center it with a hammer. --Are all six hold down plates (two per side) in place
and pinned? --If not, deflate the center bladder...go to step 4. --Is the mold
where you want it for pouring, and it is level? --If not, four people can move
it now.
Step 6: MIXING THE CONCRETE Check list: Make sure you have the following
before mixing concrete -(8) sixty pound bags of ready mix concrete (required)
-(1) one hundred pound bag of Portland cement (highly recommended) -two ounces
of non-toxic air entrainment (optional) -one cups of non-toxic super
plastisizer-ADVA FLOW (required) -one pound of non-toxic strengthening fibers
(optional) -5 pounds of Force 10,000 (A.K.A. Microsilica or Condensed Silica
Fumes) (required) -Access to fresh water hose (smart, water is heavy) -Concrete
mixer or at least a large container for mixing with shovels and hoes.
OKAY...Now you are ready to make a Bay Ball!
NOTE: THESE INSTRUCTIONS ASSUME YOU CAN MIX ALL OF THE CONCRETE FOR THE BAY
BALL (1/10TH OF A YARD) IN A SINGLE BATCH. IF YOU ARE MAKING MULTIPLE BATCHES,
BE SURE THE PROPORTIONS ARE THE SAME.
Turn on the mixer and add five gallons of water to the bucket. -Put in five
pounds of Force 10,000 (Microsilica) --Be careful, it is light and will blow
away easily. Don't breathe the stuff! -Once the water looks like black swamp
water with no lumps, proceed. -Put in the bags of concrete, one at a time. Add
water as needed to make the mix flow. -Once the mix is totally wet and has the
consistency of a thick paste, proceed. -Add the Portland cement until the mix
is very stiff and barely wet. You should now have the consistency of almost a
putty. Do not be tempted to add too much water as this will weaken your Bay
Ball considerably. Give the mixer at least 3-5 minutes to make this well mixed
without dry spots in the concrete. -Add two ounces of non-toxic air entrainment
(Skip if you have Adva flow, use if you have another brand of superplastisize).
Be careful as this stuff will stain your shirt. You will notice that the
concrete looks like it flows a little better as the tiny air bubbles act like a
lubricant. These air bubbles will not only make it easier to pour your Bay
Ball, but they will also make tiny holes in the concrete surfaces that corals
can attach to and begin to form a new reef. Let this mix for another 3-5
minutes (longer if you have time), so lots of air bubbles will form (you can't
see them but they are there). -Now for the magic. Your mix should still be way
too stiff to pour into the Bay Ball. If not, you have added too much water and
should fix the situation with more Portland or bagged concrete. The mix should
be as thick as you can make it without dry spots. Now, add the non-toxic super
plastisizer. You might want to move the position of the bucket up a little so
the concrete does not spill when it gets runny. PRESTO, your mix should look
like soup. If it is perfect, you will see the rocks in the gravel just barely
floating on the surface when the mixer is stopped. It's too runny if the rocks
all go to the bottom. It needs more non-toxic super plastisizer if it is still
too thick to pour easily from a bucket into the mold. In concrete terms, you
want a 7-9 inch slump. This means if you put the concrete in a highway cone,
then the cone on the ground, that the concrete would "slump" down 7-9
inches once the cone was removed.
Step 7: POURING THE CONCRETE Transfer the concrete to buckets and dump them
into the mold. If the first bucket does not go down well, crank up the mixer,
add more non-toxic super plastisizer, and then try again. Sometimes it is
helpful to gently tap on the hold down bar with a hammer. This vibration will
help the concrete to settle into the mold. You can even lift up the mold a few
inches and drop it to accomplish the same thing. Try to pour the concrete
evenly on each side of the center bladder. Be sure to avoid getting concrete on
the hose connector used to inflate the center bladder. Fill the mold up to the
level of the "chickens," but don't overfill or it may be difficult to
remove the center bladder. Wear gloves when touching concrete, or rinse your hands
immediately after touching concrete so your fingers do not end up looking like
your grandmother's. Push the concrete at the top away from the center bladder
and toward the sides of the mold to make a nice looking Bay Ball top. After the
concrete is a few hours old, you can even scratch in a message for the fish at
the top.
Step 8: CLEANING UP Now rinse down the outside of the mold with the hose.
Try not to get any water inside of the mold. Rinse out the buckets and concrete
mixer thoroughly. It's easy to remove wet concrete, but if you wait till it
hardens...
Step 9: BLEEDING THE CENTER BLADDER After about 2-6 hours, less in the hot
sun or more in the shade, the mold will start to get hot as the concrete sets.
Touch the side of the mold and feel the heat. When it is very warm to the
touch, let just a little bit of air out of the center bladder. About a 1-2
second burst should do. This relieves the pressure that the center bladder is
building up because its air is getting too hot and trying to expand. This step
is optional for night pours and other cool days, but becomes critical if you
have the mold sitting out in the heat of the day or in direct sun.
Step 10: HATCHING A BAY BALL The concrete should have had at least 12 hours
to set....up to 48 hours if you have the patience. FIRST, DEFLATE THE CENTER
BLADDER. If you don't do this, your ball could explode into messy chunks of
concrete rubble. Next, remove the bottom plates and side pins. Make sure the
pins, washers, wedges and square plates are in a bucket. Give them a light coat
of WD-40. Then, pull the center hold down bar out of the holes in the mold.
NEXT, REMOVE ALL OF THE PINS SECURING THE TETHER BALLS TO THE MOLD. If you
forget to do this, you will damage the tethers. Now, pull on the fiberglass
shells to remove them gently from the Bay Ball. If they are difficult, place a
large flathead screwdriver between the seams of the shells and gently tap the
screwdriver with a hammer. If you had to do this, it's time to wax your molds
again. (Use the special mold release wax provided with your system to wax the
inside surfaces of the mold.) Now you should begin removing the tether balls.
Put the pin back in the balls and use the pin as a handle to GENTLY pull them
out of the holes. If they are stuck, use the hammer to break away the concrete
around the tether balls. If you end up with a stubborn one, leave it in. It
will deflate itself from the pressure when you place your Bay Ball in the
ocean. Then it can be easily retrieved. Don't forget to remove all of the
texture balls and lobster holes. Count them so you don't leave one in by
mistake. You can shape the holes and the top entrance with a hammer if you want
more open holes. Be gentle with the hammer so that you don't end up cracking
your masterpiece. When you are finished opening and shaping, lift up one side
off of the bottom plywood and gently slide the Bay Ball off. This takes at
least three people, or two monsters. Now, clean up your mess and coat all of
the other metal parts with WD-40.
Step 10B: Curing Your Bay Ball When concrete is newly poured, it does not
have all of the strength it will ultimately need. Concrete continues to get
stronger and stronger as long as it does not dry out. You can either place a
plastic tarp around your Bay Ball and rinse it with the hose every couple of
days, or you can put the Bay Ball in the water to continue curing. Either way,
you should wait at least three days before further handling to avoid breakage.
Be sure to store the Bay Ball where it doesn't get in the way, but where it is
still easy to get to the boat for deployment.
Please email us at reefball@reefball.com
and request the “Step By Step Guild to Reef Restoration” and we will email you
a copy of our in-depth guide to coral propagation and planting on Reef
Balls. (Note: the manual is a large PDF
file, make sure you provide us with an email address that can accept files
larger than 10 MB.
PART I - GENERAL
1.01 Section Includes
A. Concrete proportioning and products to be used to secure concrete, which
when hardened will produce a required strength, permeability, and resistance to
weathering in a reef environment.
1.04 References
A. ACI-211.191-Standard Practice for Selecting Proportions for Normal,
Heavyweight, and Mass Concrete.
B. ASTM C 260- Standard Specifications for Air-Entraining Admixtures for
Concrete.
C. ASTM-C 1116 Type III- Standard Specifications for Fiber Reinforced Concrete
or Shotcrete.
D. ACI - 305R -91- Hot Weather Concreting.
E. ACI - 306R -88- Cold Weather Concreting.
F. ACI - 308- Standard Practice for Curing Concrete.
G. ASTM C 618-Fly Ash For Use As A Mineral Admixture in Portland Cement
Concrete.
H. ASTM C 494-92- Standard Specifications for Chemical Admixtures for Concrete.
I. ASTM C 1202-91- Electrical Indication of Concrete's Ability to Resist
Chloride Ion Penetration.
J. ASTM C 33- Concrete Aggregates.
K. ASTM C 94- Ready Mix Concrete.
L. ASTM C 150-Portland Cement.
M. ACI 304- Recommended Practice For Measuring, Mixing, Transporting and
Placing concrete.
N. ASTM C 39 (Standard Specifications For Compressive Testing)
O. ASTM C-1240-93 (Standard Specifications for Silica Fume Concrete)
PART II PRODUCTS
2.01 Portland Cement: Shall be Type II and conform to ASTM C-150
2.02 Fly Ash: Shall meet requirements of ASTM C-618, Type F. And must be
proven to be non-toxic as defined by the Army Corps of Engineers General Artificial
Reef Permits. Fly Ash is not permitted in the State of Georgia and in most
Atlantic States. (In October, 1991, The Atlantic States Marine Fisheries
Commission adopted a resolution that opposes the use of fly ash in artificial
reefs other than for experimental applications until the Army Corps of
Engineers develop and adopt guidelines and standards for use.)
2.03 Water: Shall be potable and free from deleterious substances and shall
not contain more that 1000 parts per million of chlorides or sulfates and shall
not contain more than 5 parts per million of lead, copper or zinc salts and
shall not contain more than 10 parts per million of phosphates.
2.04 Fine Aggregate: Shall be in compliance with ASTM C-33.
2.05 Coarse Aggregate: Shall be in compliance with ASTM C-33 #8 (pea
gravel). (Up to 1 inch aggregate can be substituted with permission from the
mold user.) Limestone aggregate is preferred if the finished modules are to be
used in tropical waters.
2.06 Concrete Admixtures: Shall be in compliance with ASTM C-494.
2.07 Required Additives: The following additives shall be used in all
concrete mix designs when producing the Reef Ball Development Group's product
line:
A. High Range Water Reducer: Shall be ADVA Flow 120 or 140.
B. Silica Fume: Shall be Force 10,000 Densified in Concrete Ready Bags as
manf. by W.R. Grace. (ASTM C-1240-93) or any of the permitted equivalent silica
fume Brands as defined in the training manual Appendix K
C. Air-Entrainer: ONLY IF ADVA is not used: Shall be Darex II as manf. by
W.R. Grace (ASTM C-260)
2.08 Optional Additives: The following additives may be used in concrete mix
designs when producing Reef Ball Development's product line.
A. Fibers. Shall be either Microfibers as manf. by W.R. Grace, or Fibermesh
Fibers (1 1/2 inches or longer) as manf. by Fibermesh. Either product can be in
ready bags.
B. Accelerators: Any Non- Calcium Chloride or Daracell as manf. by
W.R. Grace may be used. (ASTM C-494 Type C or E)
C. Retarders: Shall be in compliance with ASTM-C-494-Type D as in Daratard
17 manf. by W.R. Grace
2.09 Prohibited Admixtures: All other admixtures are prohibited. Other
admixtures can be submitted for approval by the Reef Ball Foundation Inc.
Services Division by sending enough sample to produce five yards of concrete,
the current MSDS, and chemical composition (which will be kept confidential by
RBDG Ltd.) A testing fee of $2,500 must accompany the sample. Temporary
approval will be granted or denied within 10 days based on chemical
composition, but final approval may take up to 3 months since samples must be
introduced in a controlled aquarium environment to assess impacts on marine and
freshwater species.
PART III Concrete Proportioning:
A. General: The intent of the following proportions is to secure
concrete of homogeneous structure which will have required strength and
resistance to weathering.
B. Proportions:
|
|
One Cubic Yard
|
One Cubic Meter
|
|
Cement:
|
600 lbs. (Min.)
|
356 kg
|
|
Aggregate:
|
1800 lbs.
|
1068 kg
|
|
Sand:
|
1160 lbs
|
688 kg
|
|
Water:
|
240 1bs. (Max.)
|
142 kg
|
|
Force 10K:
|
50 lbs
|
30 kg
|
|
Grace Microfibers
|
.25 bag
|
.3 bag
|
|
*Adva Flow 120 or
Adva Flow 140
|
3.5-5 ounces per 100 lbs cement
or
6-10 ounces per 100 lbs cement
|
1
|
*NOTE: Adjust Adva dosage as needed to obtain workable, placeable mix
(170-250mm / 7-10 inch slump), and to achieve .40 w/c ratio.
Micro Fibers: 0-3# (Max.) as needed to reduce micro cracking 1# (Min.) especially recommended if
Silica Fume exceeds 50# or in situations where the sun will heat one side of your mold unevenly causing expansion of inflatable bladders on that side and stressing the concrete as it sets up.
Micro-synthetic Fiber Notes
Expressly formulated to address early age cracking problems, Fibermesh® or WR Grace micro-synthetic fibers prevent 80-100% of all cracks in the plastic state - precisely when most cracks occur. During the plastic settlement phase, the fibers create a three-dimensional support network that resists the downward pull of gravity, thus keeping aggregates in suspension and promoting uniform bleeding. This network increases the tensile strain capacity of concrete during the plastic shrinkage phase as well.
Accelerator: As needed to achieve de-molding no sooner than: 3-4 hours for
heavy duty molds (All Polyform side balls) 6-7 hours for standard molds (Molds
with any tether balls)
NOTE: Silica Fume or Force 10K shall be dosed at a 10# minimum in Bay Balls
and Pallet Balls while Ultra & Reef Balls shall require a minimum of 25#.
All molds must use at least 50# for floating deployments. All mold sizes must
use at least 50# for use in tropical waters unless special curing procedures
are followed.* This product is being specified not only for strength, but also
to reduce pH to spur coral growth, to reduce calcium hydroxide, and to increase
sulfate resistance. It is a non-toxic pozzalan.
* Special curing procedures for tropical waters without 50# of Silica Fume per
yard should include storage in a fresh water or high humidity environment
for a minimum of 60 days or less with higher temperatures, or until the surface
pH of the modules is below 9.5 pH when placed in seawater.
NOTE: End of day concrete may be used, but follow these additional
requirements.
-Do not use concrete that has a temperature of over 100 degrees Fahrenheit
-The original mix must have been at least 3,500 PSI -50# of added microsilica
or more is required unless microsilica at that dose was already in the starting
mix -Add additional Portland if needed to achieve a .4 w/c ratio. Take into
account water added on site -Advise mold user to allow extra time for curing to
achieve minimum de-molding strength. -Mold or module user must be notified that
EOD waste was used.
NOTE: Fly Ash, when permitted, may be used as a substitution for cement up
to a maximum replacement of 15% and as an additional substitute for microsilica
at 30% to 40% of cementitious material. (Call RBDG for details.)
Part IV Concrete Testing Requirements:
A. Compressive strengths shall be tested in accordance with ASTM C 39.
Compressive strengths shall reach a minimum of the following table at the time
of use of at least:
|
|
Super/Ultra/Reef
Ball
|
Pallet Ball
|
Bay Ball and all
smaller sizes
|
|
Floating
Deployment
|
8,500+
|
7,000+
|
6,000+
|
|
Barge Deployment
|
7,000+
|
5,500+
|
4,000+
|
|
To remove from
mold
|
750+
|
750+
|
750+
|
|
To lift from
base
|
1,500+
|
1,200+
|
1,000+
|
B. Permeability of concrete shall be tested in accordance with ASTM C
1202-91. Coulomb requirement shall be 2500 coulombs or less at 90 days. End of
day waste shall be 3000 coulombs or less at 90 days.
THIS SPECIFICATION SHEET IS ONLY A SAMPLE. CONTACT RBDG FOR CUSTOM
SPECIFICATIONS.
1) All deployments made by authorized contractors must have at least 90% of
modules upright and intact or they must supply free deployed replacement to
purchaser. This is REGARDLESS of what the customer says is acceptable.
2) All new construction after Jan. 1, 1998 must use ADVA Flow
superplastisizer rather than WRD-19, Reduce the amount of air entrainment by
35-50% so that entrainment remains at 6% +/- 2%. (This will not impact your
costs).
2a) All new construction after July 2002 must have Attachment Adapter Plug
system installed and at least 50% of the recommended number of attachement
adapters for the particular sized Reef Ball must be usable.
3) All Reef Balls must be constructed with a "wavy" bottom formed
by adding sand in the mold before inserting center bladder.
4) The rinsing of the outside layer of concrete is not optional to expose
the surface texture due to the pH rise on the surface of the poorly set
concrete. (If rinsing is impractical, use a non-oil based biodegradable
mold-releasing compound instead of sugar water. Increase air entrainment to 8%
and do not tap the concrete into the mold heavily to create as much
"honeycombing" as you can.)
5) The following are MINIMUM guidelines for microsilica use,
primarily for pH reduction. Again, these are REGARDLESS of what the
customer says is acceptable.
Hard Coraled Waters (Florida border & south on East Coast,
Hernando County and south on Gulf.) (Anywhere near the Flower Gardens of Texas,
anywhere near Grey's Reef in SC)
Deployed less than 45 days from casting = 50 lbs/yard
Deployed > 45 days < 90 days from casting = 45 lbs/yard
Deployed > 91 days < 120 days from casting = 40 lbs/yard
Deployed > 121 days < 150 days from casting = 35 lbs/yard
Deployed > 151 days < 180 days from casting = 30 lbs/yard
Deployed > 181 days < 210 days from casting = 25 lbs/yard
Deployed > 211 days < 240 days from casting = 20 lbs/yard
Deployed > 240 from casting = 15 lbs/yard
Temperate / Cool Waters (North of above & all of West
Coast)
Deployed less than 29 days from casting = 50 lbs/yard
Deployed > 30 days < 90 days from casting = 30 lbs/yard
Deployed > 91 days < 120 days from casting = 25 lbs/yard
Deployed > 121 days < 150 days from casting = 20 lbs/yard
Deployed > 151 days < 180 days from casting = 15 lbs/yard
Deployed > 181 days < 210 days from casting = 10 lbs/yard
Deployed > 211 days < 240 days from casting = 5 lbs/yard
Deployed > 240 from casting = not required
6) End of day waste still requires full 50 lbs/yard of Mircosilica
regardless of location/time
7) All other proprietary standards, including an approved mix design must be
upheld.
Bottoms can be constructed from plate steel, other metals, or even poured
concrete. Because you cannot remove the pins from these bottoms, you must have
flared triangle hold down plates rather than our standard square plates. They
pin further away from the mold (7 inches rather than 2-3 inches) so the bottoms
must be slightly larger than their plywood counterparts. Because the flared
triangle hold down plates are larger, you need one less per side panel than the
standard plates. Additionally, short pins rather than long pins can be used
since you will not need the same thickness as with wood. The pins can be welded
to the steel bottoms or cast into the concrete bottoms.
Be sure to set your mold up and mark the pin holes properly so that the pins
line up well with the molds. About 1/2 space from the mold wall to the bottom
flange should be left on all sides.
Make sure you take precautions to avoid concrete sticking to the bottom
material you select. Wax, sand, or sugar water all work well.
Appendix I: Reef Ball Tool Kits
Reef Ball now offers tool kits for about $500...they include everything
below not in brackets [ ] with the assumption that you will have the bracketed
items on site. This is a good checklist to go by before your trainers
arrive even if you don't order a kit.
Reef Ball Tool Kit-Included or [Supplied
by client on Site]
1 Rubber Mallet [Additional Rubber Mallets]
1 Hammer-steel shaft [Additional Hammers]
[Wheelbarrow]
[2 flat head shovel, 1 spade]
1 Rubber or Nitrile Glove (For Concrete work) [Additional regular work
gloves]
1 Phillips #2 Screwdriver
1 Flathead #2 Short Shaft Screwdriver [short screwdriver for diver]
2 drill bits 1/4", 5/8",
3 Paddle Bits, 3/4", 1", 1 1/4"
[1 3 1/2" Hole Saw]
1 18 ft Lift Strap (6000 lbs) with abrasion resistance
2 5 foot 3/8" chains
2 grab hooks (6000 lbs)
[Additional 18 ft lift Straps, 2 slip hooks, 2 3/8" shackles]
Small Box Drywall Screws
Box #8 Deck Screws 1 3/4"
2 Rolls Plumbers Straps
[Additional Rolls of Plumbers Straps]
1 Roll Duct Tape
1 Can WD-40 or other lubricant spray
1 Air Blower nipple with 3-4 inch nozzle
1 Scuba Air inflator fitting
1 Hack Saw blade
1 Magnum 44 perm. marker (or equivalent)
1 Pkg needle valves
1 razor knife
1 Garden Sprayer
1 Battery Powered Drill
1 package assorted bits (Philips or flathead)
[Dewalt or professional grade Battery Powered Drill]
[Electric or Pneumatic Drill]
[Electric or Pneumatic circular saw]
[Shop Vac and air hose and fittings]
air hose and fittings for [shop vac or stinger]
16 oz. Adva 120
10 Polyform Screw Caps
Roll of Hi-Vis string
Plastic Wedge
[3 cans colored spray paint]
[Thermometer (if using concrete waste)]
[Air compressor or Scuba tank and hoses]
[Water source and hoses]
[Wood for bases]
sugar (10 lbs or more)
2 5 gallon buckets
[electric drill with 1/2" chuck if using 3"1/2' hole saw]
[Other safety equipment, i.e. eye protection, steel toed shoes, first aid
kit, eye wash kit, etc)
Refer to this PDF
File for the latest update on this base design
Appendix K: Permissible Brands of Microsilica
|
Company
|
Brand
Name
|
Form
|
Manufacturers
|
|
Axim
Concrete
Technologies, Inc.8282 Middlebranch Rd.
Middlebranch, OH 44652
P/S
Code 6502-01
|
CATEXOL SF-D
|
Densified
|
Elkem Materials,
Alloy, WV
|
|
Elkem
Materials
P.O. BOX 266
Pittsburgh, PA 15230
P/S
Code 6643-01
|
EMS-970 S
EMS-970 DA
|
Slurry- 52%
Densified
|
Elkem Materials,
Alloy, WV
|
|
Euclid Chemical
19218 Redwood Rd.
Cleveland, OH 44110-2799
P/S
Code 6511-01
|
EUCON MSA
|
Densified
|
Elkem Materials,
Alloy, WV
|
|
W.R.
Grace & Co.
Ms. Denise Preston
62 Whittemore Ave.
Cambridge, MA 02140-1692
P/S Code 6517-01
|
FORCE 10,000
|
Densified
Slurry-
50%-52%
|
Norchem Concrete
Hauppauge, NY
Elkem Materials
Alloy, WV
|
|
Hydration Kontrol
Daniel J. Hollman
4443 U.S. 27 South
Alexandria, KY 41001
P/S
Code 6521-01
|
HY-KON EMS-970 S
HY-KON EMS-970DA
|
Slurry-52%
Densified
|
Elkem Materials
Alloy, WV
|
|
Master Builders, Inc.
Francis McNeal
23700 Chagrin Blvd.
Cleveland, OH 44122-5554
P/S
Code 6528-01
|
RHEOMAC SF100
RHEOMAC SF110
|
Densified
Slurry-52%
|
Norchem Concrete Prod.
Hauppauge, NY
|
|
RussTech,
Inc.
Gary Russell
11208 Decimal Drive
Louisville, KY 40299
P/S
Code 6546-01
|
RUSSTECH CSF
|
Densified
|
Elkem Materials
Alloy, WV
|
|
Sika
Corp.
201 Polita Ave.
Lyndhurst, NJ 07071
201-933-8801
P/S
Code 6548-01
|
SIKACRETE 950DP
SIKACRETE 950
SIKACRETE 950A
|
Densified
Slurry 45% +2%
Slurry 52.5%+/-
2.5%
|
Elkem Materials
Alloy, WV
Norchem Concrete
Prod.
Hauppauge, NY
|
In general, any brand of microsilca is acceptable as long as the label
indicates that it is DENSIFIED. There are only two manufacturers of
silica fume worldwide so all the DENSIFIED forms are essentially the same...go
for the best price! Silica Fume is cheaper in Canada and Europe than in
the USA.
Appendix L: W.R. Grace Worldwide Locations (as of June 2006)
|
|
|
Canada
|
W. R. Grace & Co.
42 Fabre Street
Valleyfield, Quebec, Canada J6S 4K7
(514)373-4224
Fax: (514)373-7327
Grace Performance Chemicals
294 Clements Road West
Ajax, Ontario, Canada L1S 3C6
(905)683-8561
Fax: (905)683-5947
|
|
|
|
|
|
Belgium
|
BELGIUM/NETHERLANDS/LUXEMBOURG:
Grace N.V.
Grace Davison - Benelux Sales Office
H. Heymanplein 232
B-9100 Sint-Niklaas
+32 3 766 3433
Fax: +32 3 766 4443
|
|
|
|
|
|
Denmark
|
W. R. Grace A/S
Generatorvej 8 D
DK-2730 Herlev, Denmark
(45)44.85.37.00
Fax: (45)44.85.37.37
Darex Container Products
Grace Construction Products
|
|
|
|
England
|
W. R. Grace Ltd.
628 Ajax Avenue, Slough
Berkshire, United Kingdom SL1 4DG
44(1753)69.2929
Fax: 44(1753)63.7702
Darex Container Products
Grace Construction Products
Grace Davison
Oakpark Business Centre
Alington Road
Little Barford, St. Neots
Cambridgeshire, United Kingdom PE19 6WL
44(1480)32.4430
Fax: 44(1480)32.4433
Grace Davison
|
|
|
|
France
|
W. R. Grace S.A.
33 Route de Gallardon
F-28234 Epernon Cédex, France
+33(2) 37 18 87 62
Fax: +33(2) 37 18 86 84
Darex Container Products
Grace Construction Products
Grace Davison
|
|
|
|
Germany
|
Grace Darex GmbH
Erlengang 31
D-22844 Norderstedt
Germany
Phone: +49 40 52601 104
Fax: +49 40 52601 190
Darex Container Products
GRACE GmbH & Co. KG
In der Hollerhecke 1
D-67545 Worms
Germany
Phone: +49 (0) 62 41 - 403 00
Fax: +49 (0) 62 41 - 403 211
Grace Davison
Grace Bauprodukte GmbH
Pyrmonter Straße 56
D-32676 Lügde
Germany
Phone: +49 5281 7704 0
Fax: +49 5281 7704 99
Grace Construction Products
|
|
|
|
Greece
|
Grace Hellas E.P.E.
20 Lagoumitzi St., GR-17671 Kallithea
Athens, Greece
30(1)92.31.404
Fax: 30(1)92.35.993
Darex Container Products
|
|
|
|
Ireland
|
Grace Construction Products (Ireland) Ltd.
Unit 200, Holly Road
Western Industrial Estate, Naas Road
Dublin 12, Ireland
353(1)456.9600
Fax: 353(1)4569.604
|
|
|
|
Italy
|
W. R. Grace Italiana S.p.A.
Via Trento 7
I-20017 Passirana di Rho (Milano), Italy
39(2)93537.1
Fax: 39(2)93537.555
Darex Container Products
Grace Construction Products
Grace Davison
|
|
|
|
Poland
|
GRACE Sp. z o.o.
ul. Szczepanowskiego 10/2
60-541 Poznan, Poland
+48 (61) 8432174, 8411948
Fax: +48 (61) 8432175
Grace Construction Products
Grace Davison
|
|
|
|
Russia
|
W. R. Grace LLC
Ulitsa Smolnaya 24D, 8th Fl N
125445 Moscow, Russian Federation
7(501)795.01.01
Fax: 7(501)795.01.00
Darex Container Products
Grace Davison
|
|
|
|
Spain
|
Grace, S.A.
Riera de Fonollar 12
E-08830 Sant Boi de Llobregat
Barcelona, Spain
34(93)635.10.00
Fax: 34(93)635.11.11
Darex Container Products
Grace Construction Products
Grace Davison
|
|
|
|
Sweden
|
Grace AB
Berga Allé 1
SE-254 52 Helsingborg, Sweden
46(42)16.78.00
Fax: 46(42)16.78.05
Grace Construction Products
Grace Davison
|
|
|
|
|
|
South Africa
|
W. R. Grace Africa (Pty.) Ltd.
Corner of Mill & Iscor Streets
Bellville 7530, Cape Town, South Africa
27(21)951-7011
Fax: 27(21)951-7022
Darex Container Products
W. R. Grace Africa (Pty.) Ltd.
64 Rigger Rd.
Spartan, Kempton Pk. 1619,
Johannesburg, South Africa
27(11)970-3985
Fax: 27(11)394-1186
Grace Construction Products
Grace Davison
|
|
|
|
|
|
Argentina
|
Grace Argentina S.A.
Primera Junta 550
(1878) Quilmes
Prov Buenos Aires, Argentina
54-11-4-229.5300
Fax: 54-11-4-229.5306
Darex Container Products
Grace Construction Products
Grace Davison
|
|
|
|
Brazil
|
Grace Brasil Ltda
Av Mofarrej 619, Vila Leopoldina
São Paulo 05311-902, Brazil
55(11)3649.2700
Fax: 55(11)3649.2783
Darex Container Products
Grace Construction Products
Grace Davison
|
|
|
|
Chile
|
Grace Quimica Compania Limitada
Lago Riñihue 02176
Av. Lo Espejo - San Bernardo
Santiago, Chile
56(2)484-2300
Fax: 56(2)484-2392 / 484-2394
Darex Container Products
Grace Davison
|
|
|
|
|
|
|
Colombia
|
Grace Colombia S.A.
Calle 17 #69-18
Bogotá DE, Colombia
57(1)411-3875-27-66
Fax: 57(1)411-09-62
Darex Container Products
Grace Davison
|
|
|
|
Mexico
|
W. R. Grace Holdings, S.A. de C.V.
Calle Ocho, #710
Fraccionamiento Industrial
Toluca, Estado de México, México
52(72)79-3800
Fax: 52(72)79-3825
Darex Container Products
Grace Construction Products
W. R. Grace Holdings, S.A. de C.V.
Axis Tower
Prolongacion Paseo de la Reforma #61
Piso 10, Col. Paseo de las Lomas, Santa Fe,
Delegacion Alvaro Obregon, CP 01210
México City, México
52(5)267-1400
Fax: 52(5)258-5604
Darex Container Products
Grace Davison
|
|
|
|
Peru
|
W. R. Grace & Co. - SUCURSAL
Av Michael Faraday 671
Lima 3, ATE, Peru
51(1)326-1290
Fax: 51(1)326-3189
Darex Container Products
Grace Construction Products
Grace Davison
|
|
|
|
Venezuela
|
Grace Venezuela S.A.
Prol Ave Michelena con Calle Norte-Sur 3
Zona Industrial Municipal
Valencia 2003, Venezuela
58(41)30-87-11
Fax: 58(41)33-35-16
Darex Container Products
Grace Construction Products
Grace Davison
|
|
|
|
|
|
Australia
|
Grace Australia Pty. Ltd.
1126 Sydney Road
Fawkner, Victoria 3060, Australia
61(3)9358-2244
Fax: 61(3)9357-3013
Darex Container Products
Grace Construction Products
Grace Davison
|
|
|
|
China
|
W. R. Grace (HK) Ltd.
10/F AXA Centre
151 Gloucester Road
Wanchai, Hong Kong
(852)2590-2828
Fax: (852)2811-2661
Darex Container Products
Grace Construction Products
Grace Davison
Grace China Ltd.
30 Hong He Road
Minhang Economic Zone
Shanghai, P.R.C.
86(21)6430-0950
Fax: 86(21)6430-0425
Darex Container Products
Grace Construction Products
|
|
|
|
India
|
W. R. Grace & Co. (India)
420, 3A Cross, 3rd Block
16th Main Koramangala
Bangalore 560 034, India
91(80)552-0316
Fax: 91(80)553-4500
Darex Container Products
|
|
|
|
Indonesia
|
P.T. Grace Specialty Chemicals Indonesia
Cikarang Ind. Estate, Kav C-32
Cikarang, Bekasi 17530, Indonesia
62(21)893-4260
Fax: 62(21)893-4315
Darex Container Products
Grace Construction Products
|
|
|
|
Japan
|
Grace Japan K. K.
100, Kaneda
Atsugi-shi, 243, Japan
81(462)25-8800
Fax: 81(462)24-9254
Darex Container Products
Grace Construction Products
Grace Japan K. K.
Tomita Bldg, 9F, 2-5, Ushijima-cho
Nishi-ku, Nagoya 451, Japan
81(52)586-9630
Fax: 81(52)586-9616
Davison Chemicals
|
|
|
|
Korea
|
Grace Korea Inc.
70-1, NamDong Industrial Complex, 639
KoJan-Dong, NamDong-Ku
InCheon (405-310) Korea
82(32)819-2640
Fax: 82(32)816-9199
Grace Construction Products
Darex Container Products
Grace Korea Inc.
HanMi Plaza 501, 925-3
OSan-Dong, OSan-Si
KyoungKi-Do (447-010)Korea
82(31)376-3581
Fax: 82(31)376-3585
Grace Davison
|
|
|
|
Malaysia
|
W. R. Grace Specialty Chemicals (Malaysia) Sdn. Bhd.
Lot 114 & 115, Gebeng Ind. Estate
26080 Kuantan
Pahang Darul Makmur, W. Malaysia
60(9)583-6225
Fax: 60(9)583-6642
Grace Davison
W. R. Grace (Malaysia) Sdn. Bhd.
7, Lorong 1
Off Jalan Balakong
43200 Cheras Jaya
Selangor Darul Ehsan, Malaysia
60(3)904-6133
Fax: 60(3)904-7322
Grace Construction Products
|
|
|
|
New Zealand
|
Grace New Zealand Limited
Prosser Street
Elsdon, Porirua, New Zealand
64(4)237-6069
Fax: 64(4)237-9905
Darex Container Products
Grace Construction Products
|
|
|
|
Philippines
|
W. R. Grace (Philippines) Inc.
Silangang Canlubang Industrial Park
Canlubang, Calamba
Laguna, Philippines
63(49)549-7373
Fax: 63(49)549-7778
Darex Container Products
Grace Construction Products
|
|
|
|
Singapore
|
W. R. Grace (Singapore) Pte. Ltd.
501 Orchard Rd, #07-02 Wheelock Pl
Singapore 238880
(65)737-5488
Fax: (65)737-5826
Darex Container Products
Grace Construction Products
W. R. Grace (Singapore) Pte. Ltd.
501 Orchard Rd, #07-2A Wheelock Pl
Singapore 238880
(65)737-5488
Fax: (65)737-5826
Grace Davison
|
|
|
|
Taiwan
|
W. R. Grace Taiwan Inc.
# 38, Pei-Yuan Rd.,
Chung-Li Industry Pk.,
Taoyuan, Taiwan
886(3)461-5459
Fax: 886(3)461-5463
Darex Container Products
Grace Construction Products
|
|
|
|
Thailand
|
W. R. Grace (Thailand) Limited
253/2 Bangpoo Industrial Estate
Sukhumvit Road, km 34
Samutprakan 10280, Thailand
66(2)709-4470
Fax: 66(2)709-3522-3
Darex Container Products
W. R. Grace (Thailand) Limited
Wong Wai Wit Bldg
2/F #889 Srinakarin-Teparuk Rd
Amphur Muang, Samutprakan 10270, Thailand
66(2)748-7921
Fax: 66(2)748-7341
Grace Construction Products
Grace Davison
|
|
|
|
Vietnam
|
W. R. Grace (HK) Ltd.
Unit 1001, Harbor View Tower
35 Nguyen Hue Boulevard, 1st District
Ho Chi Minh City, Vietnam
(84)(8)8214-790
Fax: (84)(8)8214-792
Darex Container Products
|
Appendix M: Fiberglass Rebar Suppliers
Other Fiberglass Rebar Suppliers
We don't recommend any specific vender nor warrant the quality of their products...this
is a list we found on the internet to help folks find the rebar locally.
http://www.hughesbros.com/RebMain.html
http://www.conservepoxy.com/tech800.htm
http://www.atmtrade.com/fibreglass_rebar.htm
http://www.tillco.com/welcome.html
Listing of FRP Rebar Manufacturers
Dow Chemical - Fulcrum Company
Building 3, #4
312 Washington Street
Wellesley Hills, MA 02481
CONTACT: David Vanderpool
PHONE: 781-431-6439
FAX: 800-409-4144
EMAIL: drvanderpool@dow.com
WEBSITE: www.dow.com
Hughes Brothers, Inc.
210 N. 13th Street
Seward, NE 68434
CONTACT: Doug Gremel
PHONE: 402-646-6211or 800-869-0359
FAX: 402-643-2149
EMAIL: doug@hughesbros.com
WEBSITE: www.hughesbros.com
Kodiak Fiberglass Rebar, Inc.
1517 Columbia St.
Liberty, TX 77575
CONTACT: Leroy Heston
PHONE: 936-334-0183
FAX: 936-334-8880
EMAIL: leroywh@txucom.net
Pultrall, ADS Composites Group
1191, Rue Huppe'
Thetford Mines, Quebec G6G 7Y6
CANADA
CONTACT: Sam Steere
PH/FX: 972-818-1993
EMAIL: sam@fiberglassrebar.com
Copyright ©1995, 1996, 1997, 1998, 1999, 2000, 2001, 2002,
2006 Reef Ball Foundation, Inc. all rights reserved. See brochure page footer for information on patents,
copyrights, trademarks and service marks referenced, but not indicated, on this
page.